Showing posts with label etsy. Show all posts

October 29, 2010

for my fellow Etsy sellers, there have been some very important changes lately that WILL affect you!! PLEASE READ

If you are a seller on Etsy, I think you NEED to read this post, and then browse around the Etsy forums for more information. Link to the main Etsy forums HERE.

Etsy has been making major changes lately, and they never notify all users about anything. So, since I know most Etsy sellers don't frequent the Etsy forums, I'm posting them here---

the first one is wider listing pages that greatly affect the photos and seeing (or not seeing) the item description. The photos were made HUGE-- if you have vertical photos, they will not be seen in their entirety. If your photos are smaller, they may end up with gray bars on the edges to make them fit the new, larger space. Even if you have relatively square photos, the page re-design to huge photos means that in most cases, the item description is "below-the-fold" and people will have to scroll down to read it. In addition, they have redesigned where the clickable things (your avatar, etc) take a shopper when they click on them, and most of them take the buyer NOT back to your shop, but to your profile or even OUT of your shop. Many threads in the forums about this topic, but one of the main (it's huge, sorry about that) is here: wide listing page thread.

the second is a change to the profile pages that will connect ONE profile to ALL the shops an owner may have (if they have more than one shop). Not a huge change, but it still changes the way your profile page looks. Click here to read a forum thread about this.

The third is a change to the way item results are shown-- there is no "jump-to" page box at the bottom of a list, so buyers have to scroll through pages sequentially to look at items in a category or after a search. A buyer can no longer type "34" in the page box to jump to the 34th page of a category or search. This means that realistically, only the top pages (i.e., most recently listed) in a category will ever be seen by a casual browser, because they probably won't want to keep scrolling thru page after page to ever reach the 34th page of a category or search results. Click here to read a forum thread about this.

The fourth one is the most recent (I think) and is a MAJOR change to the way results will be shown when buyers are browsing by clicking on a category or doing a very general search. Etsy says it's only minor, but I believe, along with many other sellers, that it is a HUGE disservice to the sellers, and will be very negative. Etsy has changed the functionality of the site to ONLY list 50,000 results when a buyer clicks on a category page or does a general search. This may sound like a huge number, but depending on how saturated the category is (think jewelry, clothing, art, or wedding, for example), this number of items is a VERY small percentage of the actual items in the category-- as low as 2% or 3% in some cases. And, since the default search is "most recently listed" this limitation will now only show the last few day's listings of jewelry, for example. Read this link for a very concise explanation of this issue.

These kinds of changes are being made almost daily, and can negatively affect casual, low-volume sellers who may not know they're being made. Especially since it's (supposedly) going into the holiday shopping rush-- if your views/sales have dropped off, these changes may be why.

And since Etsy doesn't feel like they NEED to tell ALL sellers about these things, I (along with other sellers who are concerned about these changes affecting our sales and views) am trying to do what I can to get the word out.

October 25, 2010

playing catch up...

some photos from the last few weeks, finally off the camera. (I have a problem remembering to get pictures off the camera- I finally HAD to, because the memory card was full and I had to make room to take more pictures!) A couple weeks ago, we drove up to Cave Creek, AZ and spent the a few hours looking in some really neat Western interior decorating stores, and ate at a wonderful Mexican restaurant... the restaurant, El Encanto, had a pond and an outdoor courtyard, alont with some of the best Mexican food I've had in a while. The restaurant had its own floor show; the ducks, geese, and turtles in the pond would hang out and wait to pick up whatever diners would toss their way. This might be hard to see, but the duck on the right has a "top-knot" of feathers on top of its head... it looked quite a bit like a bad toupee!! We had to ask the waiter about it; he said it's just a particular kind of duck, and thast they've nicknamed this particular duck "James Brown!!"
These ducks were quite friendly! This little female was very tame, and would come right up to us. (of course, the "duck-chow" we bought to feed them might have helped, but still, it was fun.)
Here, she takes a bit of kibble from Tom's hand, with a few of her friends waiting a bit farther away behind the fence.
We bought a fresh chili ristra while we were up there. We weren't particularly looking for one, but we've wanted one of these for years, so we jumped at the chance to pick one up. They have a wonderful roasted aroma!! The peppers have dried over the course of the last couple weeks, but they're still gorgeous, and quite a traditional decoration. They should last us for at least a couple years. (we could actually use them to cook with, too, but I think we'll probably just emjoy looking at them.)
now, on to a few pieces of artwork that I've made over the last few weeks. This is a 4x4 canvas piece that I have for sale right now in my new online shop, at ArtFire.com. (check it out here.) It started out as layers of acrylic paint over a collaged base, then I added a bit of text and a distressed photo of a dragonfly (I took the photo a couple years ago when we visited the Sonoran Desert Museum in Tucson, when my parents and sister came to visit). It still looked like it needed "something" to finish it off, so I added some gold flourishes with heat embossing.
These are 6x6 collages on 3/4 inch plywood; I bought an entire sheet and had it cut up into different sized pieces to use for artwork. I collaged the background with vintage text papers, then added cut-paper borders, a bit of glitter, and focal images that I hand-cut from black cardstock. The owl is already sold, but the cat's still available. I probably won't list it for sale till next Halloween, though, since Halloween is almost here. (where did the time go, anyway??)
This jaunty fellow (also sold) was also hand-cut from black cardstock; this one took small scissors and an exacto knife-- it was fiddly, but well worth it-- I just love his bow tie! It's also on 3/4 inch plywood, this time an 8x10 inch collage. Sort of like making a journal page, but one you can hang up!! (I will definitely be making more of these.. they're a lot of fun, and besides, since I bought a 4 x 8 foot piece of plywood, I have well over 40 pieces of wood!)
And lastly, here's a tag I made from just the bits and pieces on my desk. I needed a "thank you" gift to put in with an Etsy shop sale, and didn't have lots of time to pull it together. So, I worked with what I had... most of the time, doing that works lots better than I think it will!! (I love that little hummingbird stamp, too... I definitely need to find it on my desk, and put it to work again.)

September 28, 2010

must try this recipe!!

a recipe post for a wonderful-sounding ginger cake with dulce de leche filling that I must try- when it gets cooler than 100F!! ...from a long-ago Etsy seller's blog-- one of the "Etsy old-timers" who was always giving sage advice (and some sarcastic bits, too) in the forums... (I just remembered her Etsy username: Meringueshop!)

Don't ask me how I found her blog because I don't remember where I was clicking-- don'tcha hate when that happens?!?

August 23, 2010

some crafting has been going on...

I just haven't had much "crafting mojo" lately, but I have done a couple things. (I've got a lot of things half-finished; it's completing them that's the issue, as usual, but more so lately.)

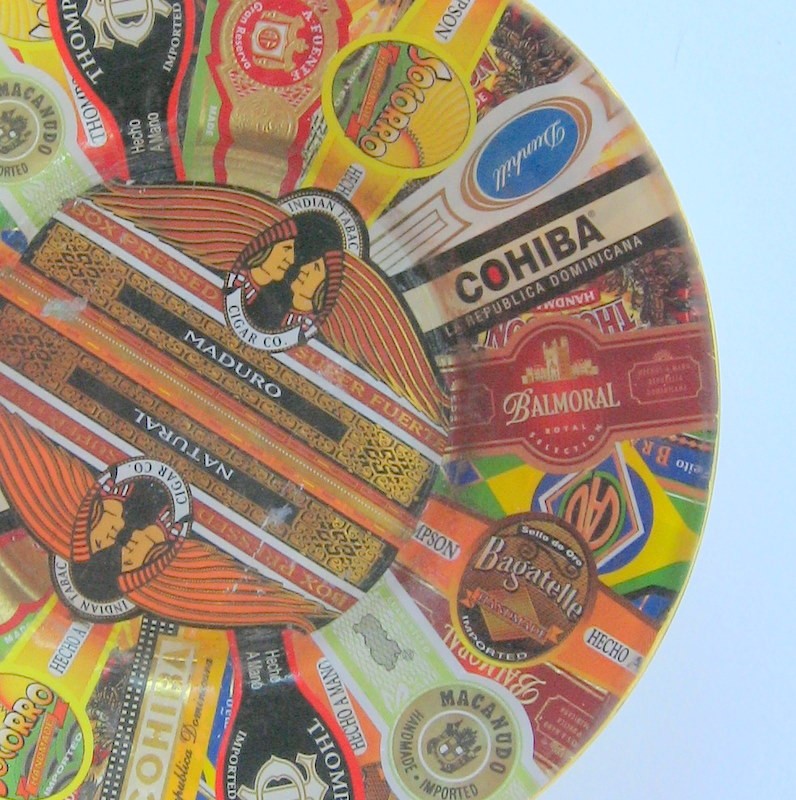
I got out my collection of cigar bands again, and decoupaged them onto a glass saucer I scored at the thrift store. The saucer is only 6 inches across, but it still took a fair number of cigar bands to fill in. I stuck with a more limited number of cigar brands, to make a fairly symmetrical design with a somewhat more subdued color palette.

I started by printing out a clip art image from my computer for the center design, but our printer ink isn't water-resistant, so I had to change my idea. I like what I ended up with, though: two Indian Tabac cigar bands that I trimmed to fit the center part of the plate. These plates take a while to decorate, and are actually quite messy to do (I get gel medium all over everything while I'm working on them!), but I really like the way they turn out when they're done. This plate is for sale in my Etsy shop, so if you know a cigar aficionado who needs someplace to put paperclips on their desk, or something to corral their loose change on their dresser, this is a perfect gift for them!! (another reason to check out my Etsy shop: the site recently changed the formatting for individual shops, so it's been redesigned a bit to make the format wider, with larger pictures... the design isn't quite final yet, but I think it shows off the items nicely! And of course, all sales right now will go towards my 3-Day for the Cure fundraising for breast cancer!!)

These tags are part of a huge pile of manila shipping tags that I hand-dyed over the last couple weeks... I have a somewhat limited choice of inks to use, but these were made by mixing butterscotch yellow and a barn red, to come up with a nice fall-ish orange color. I stamped them with Pumpkin StazOn ink, then added a couple touches of vintage dictionary paper.
I love the glowing orange color; it reminds me of autumn. (Which isn't here in AZ yet, unfortunately- it's been hot and humid, with very infrequent monsoon storms. The storms don't even clear out the humidity.) These tags are also for sale in my Etsy shop- check them out, along with others, in the Tag and Bookmark section of my shop. Look for more crafting soon. if I can remember to post the pictures, that is... :D

June 28, 2010

weekend photo round up

usually weekends are reserved for relaxing, but the last couple, we've been busy. This past weekend we worked on our patio ---> screened porch conversion. The framing is all up, and needed to be painted before we can install the screen. Turns out there was a lot more wood there than we thought! Tom stayed up all night (!!) on Friday, getting most of it primed... I started on the finish coat when I got up Saturday morning. The two of us worked most of the weekend on it, till it got too hot to work, and finally finished the painting around lunchtime on Sunday. Whew!! Now, we just need to put up the screen. And cut the trim to length. And paint the trim. And install the trim.... okay, so it's not as far along as we'd like to think, but it will definitely be done by fall, which is okay, since it won't be cool enough to sit out there till then, anyway.
After working outside in the heat all weekend long, THIS is how we both felt!! Ariel is so funny- she has that kitten energy, tearing around and bouncing off walls, then konking out all the sudden...
The pic above was taken this afternoon; Tom grabbed the camera and snapped it quick, before anything happened to upset the status quo-- Butters and Ariel, sitting next to each other, with no hissing or swatting of paws!! It's amazing what hunger can do, hmmm?? Really, it's been going pretty well, all things considered; I've actually seen Butters playing chase with Ariel a few times, till she gets overwhelmed, hisses, and stalks off to sulk. I don't know whether they'll ever snuggle together like Pandora and Butters used to, but getting along together is a good start, after only a few weeks.
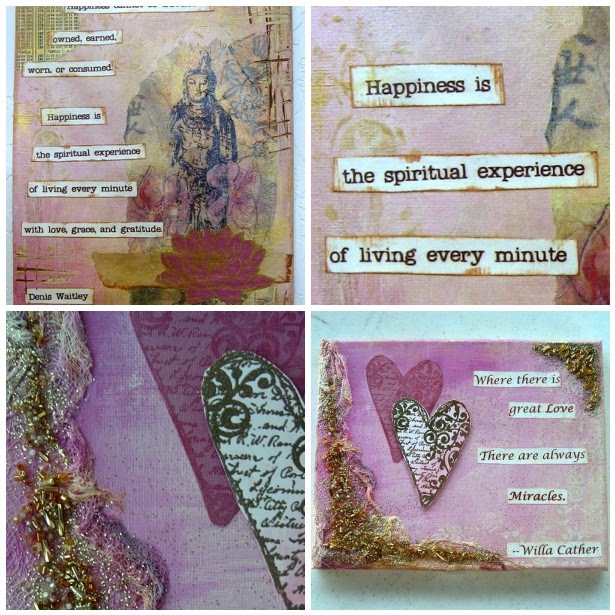
These last two photos are some of my latest art/craft projects. The pic above shows two 8x10 inch mixed media canvases that I've made recently. The top one features a Buddha-patterned napkin, layered acrylic paint, gold details, and an inspirational quote. The bottom one features rubber stamping with heat embossing, acrylic paint, hand-dyed cheesecloth for texture, glitter, beads, and another quote (this one from Willa Cather). They're both currently for sale in my Etsy shop, and the net proceeds from the sales will benefit my 3-Day for the Cure Walk fundraising efforts.
These pendants are also currently for sale in my Etsy shop. All proceeds from these will also go towards my 3Day fundraising, and even better, all these have FREE shipping! These pendants are lots of fun to make; the dominos are a fun shape, and not quite as small as the scrabble tiles. I've found it a bit difficult to find patterned paper on a smaller scale that looks good when trimmed to these sizes (1x2 inches and 3/4 inch), but that's what makes it a challenge!

June 25, 2010

I've been featured in an Etsy Treasury!

One of my items was featured today in an Etsy treasury!! yay!! and I actually had enough time to get a screenshot of it-- lol!! (my item is circled in the photo below) my item (click here to be taken to the listing for it) is a cute little vintage book about a moth's life cycle... I found a handful of really nice vintage children's books a while ago in the Goodwill store, and I had to rescue them from languishing on the shelf.
The second pic shows the entire treasury... there are some beautiful things included! You can click on this link to go to the Etsy treasury page to look at it for yourself. KatrinShine is the nice seller who featured me; her store is here. And don't forget that right now, all pendants in my shop have FREE SHIPPING, and that all summer, proceeds from the sale of handmade items will help support my 3-Day for the Cure walking fundraising and breast cancer research efforts.

December 20, 2009

thrift store score!! (lots of photos...)

Yesterday, I headed to Casa Grande (a larger town about 20 miles away) to pick up Mexican for dinner. Of course, I couldn't just go to the restaurant and come back; I spent some time treasure hunting at the local Savers. You never know what you'll find in thrift stores; most of it is junk, in my opinion, but sometimes you can find a gem hidden in the "stuff" jumbled on the shelves. Most of my time was spent perusing the children's books and the Christmas decorations; I saw some vintage Christmas decorations that I thought long and hard about then left behind, but I just couldn't leave this stack of books in the store... they had to come home with me!! I do have a small collection of children's books but since I don't have much room on my shelves, these will be going up for sale in my Etsy store over the course of the next couple days. All of these are either Wonder Books or Rand McNally Elf books except the one in the back, which is a California state music textbook. The little ones are Rand McNally Junior Elf books. That book size really brought back some memories- I remember reading books like this in first grade, I think it was. These all have copyright dates in the 1950s, with some being reprinted in the early 1960s, by the look of the illustrations. (my Roman numeral knowledge really got a workout!)
The artwork in these is just wonderful, right down to the end papers! The top pic shows the end papers from "The Giant's Shoe" and the bottom pic is the end papers from "No-Good the Dancing Donkey."
Here's a shot inside "Mother Goose," a Rand McNally Tip-Top Elf book, which is a little larger than the Junior Elf books. (copyright date 1958; the illustrations have that late 50s/early 60s look to them.)
This sweet illustration is from a Junior Elf book titled "A Moth is Born." It shows the life cycle of a cecropia moth all the way from egg thru cocoon and moth. Copyright 1957, these illustrations remind me of the old paperback type of nature identification books.
This pic is the end papers from the book "Three Little Ducks." The end papers don't really have anything to do with the story, but I love the little squirrel, puppy and kitten! Copyright 1955, this book follows Ducky Diddle, Ducky Doodle, and Ducky Daddle (don't you just love the names??) as they wander off and have adventures while they are supposed to be taking a nap.
This is from Heny Penny, which is one of my favorites stories from growing up... I love the little kerchief on her head! Somehow the colors from vintage books have more "warmth" to them than new books... not sure what it is, maybe the age of the paper mellows the colors?
This cute illustration is from "December is for Christmas," copyright 1961. Jeremy the rabbit learns he can read, and reads a 2nd grader's story about Christmas to his family, which inspires them to decorate a tree and celebrate Christmas with all the animals in the forest.
Here, Alice meets the Caterpillar on her adventures in Wonderland, from a 1951 edition Wonder Book. This one doesn't even look like anyone ever read it- the colors are really vibrant, and the pages are all in great condition.
This pic is from "I Love the City" which is a California textbook that has small poems and short music songs in it. I love the washed-out, soft colored watercolor illustrations! There were actually three copies of this book, and I don't think any of them had ever been used, either. Thanks for enjoying my thrifted books with me!! I always wonder how things end up in the thrift store, and what chain of events brought them there, especially items like these. There were quite a few more I might have bought-- I felt sort of sorry for them, being jumbled in such disarray on the thrift store shelves in amongst countless wrinkly, torn, and dirty paperback books. I hope I can find them good homes!!

January 19, 2009

New Year's destashing

it's the new year, so that means organizing and cleaning in my art studio... one of the first things I need to do is sort thru my books- I have lots of books and magazines, and I feel bad that I haven't touched some of them in quite a while, so I'm putting them into my Etsy shop for someone else to enjoy and use! All are gently/barely used, and no writing or creases inside. (Check out my Etsy shop, or contact me thru Blogger if you're interested in any of them.) Supply Savvy Scrapbooking- how to make scrapbooking embellishments out of things you have around, and ways to save $$ but still have really cool-looking album pages. 164 pages, published by Creating Keepsakes in 2006. Price: $10 plus shipping (via Media Mail).
Vintage Greeting Cards with Mary Jo McGraw- "how to create handmade cards that capture the look and feel of antiques and heirlooms." Learn techniques for aging paper, how to use unusual materials such as mica, and ways of using metal and non-traditional card-making materials. 128 pages, published 2003. Price: $12 + shipping (via Media Mail).
Our Family Scrapbooks, by Lisa Bearnson and Becky Higgins. from Amazon: "Lisa Bearnson and Becky Higgins share their family albums and give you easy-to-implement ideas for creating your own family albums..." Each album shown also includes a sketch and a bonus layout so you can adapt the ideas to your own photo albums. 164 pages, published by Creating Keepsakes company. Price: $10 + shipping (via Media Mail).
Collage Creations... "over 20 step-by-step creative collage techniques to decorate home decor items and gifts with a range of creative materials from handmade paper and collage ephemera to rubber stamps, paints, and other embellishments." 128 pages, published by North Light Books in 2004. Price: $12 + shipping (via Media Mail).

November 23, 2008

Christmas comes to Crimson Cat on Etsy

I've added some holiday items to my Etsy shop; it was looking a bit bare after a summer of neglecting it, and I love Christmas!! (and I love paper... all the tags and ornaments that I make are paper-based, with an added twist of some sort!) This Victorian angel ornament is highlighted with metallic pen, gold leafing pen, and glitter. It was made to mimic the antique German scrap ornaments made with batting, paper, and glitter; I love them, but they're certainly hard to find nowadays! The edging is ruffled tissue paper that I basted and gathered into a ruffle before gluing to the ornament. I like how this turned out, although the basting was a bit tedious- tissue paper is fragile! I also have another angel (pink and dark blue, with silver accents) in my shop.
This Victorian girl is definitely full of sparkle! She started out life as the lid from an orange juice can, if you can believe that! It was covered in glue, then glittered with extra-fine art glitter. The sequins were glued onto the edge one by one with E6000 adhesive, which was definitely a time-consuming job, also, but I think the edging definitely makes the ornament. The back is decorated with scrapbook paper and a punched-paper pointsettia, so it looks good from all angles. I also have a glittery Santa Claus ornament in my shop, decorated with real mica snow. (Showing these is making me get antsy to pull out all of our decorations, but I think we'll wait till at least the day after Thanksgiving... not much longer than that, though!)
I always like decorating gift tags, even for my own gift-giving. (It also makes the gift-wrapping a lot simpler; wrap the gift with plain brown kraft paper, or plain white tissue, tie on a decorated tag, and you're done!! These two pictures show two sets of tags- the first uses cancelled postage stamp snowflakes to strike a wintry theme, and the second is decorated with antique gold embossing powder Christmas trees in a non-traditional color scheme.
This preview of Christmas also makes me think that I haven't designed my Christmas cards yet... I think I'd better get to work!! (I'll show you what they look like when I get them done, which better be soon, hmmm??)

November 19, 2008

I'm back...

to Etsy! check out my shop here. ...after taking the summer off, to deal with 10-hour days at work (lots of overtime), a new puppy, and too much to do in not enough time, generally, I finally decided to get back into it. On-line selling definitely takes some varied skills, from photography to copy-writing to marketing, and I hope to keep the shop updated more regularly this winter. I'm also going to be de-stashing some of my (gently) used art books and back issues of magazines, once I figure out media-mail postage rates.

March 18, 2008

art project pics as promised...

...although a little late. Life intrudes at the most inopportune times, doesn't it?? I was planning on posting these pictures yesterday, but I had an extra-long day at work (FDA auditor + Monday... 'nuff said!), and didn't feel like doing anything once I got home except falling asleep on the couch in front of the TV after eating Filiberto's leftovers... it's a sad way to spend the evening, isn't it? I agree, but sometimes, it's just what happens. Today is another day, I left work at the normal time, and the audit is now over, with no observations- yay! Anyway, these pictures are from this weekend's crafting... I spent the afternoon cutting, pasting, and painting (I still have some acrylic paint underneath my fingernails... note to self: be extra careful with the black paint!) I am still not comfortable working with overly-large projects, so these are 4 x 6 inches, postcard size. These first two pics are a technique I saw on Flickr (I think from Jeannine P, although I don't remember for sure- there is such wonderful inspiration everywhere on that site!)

The colored sections are regular old Crayola crayons, scribbled onto a piece of watercolor paper. While I was doing this, Tom had to smell them, to reminisce... I think I heard somewhere that crayons are one of the most recognizable smells anywhere- I know they are for me. After the crayon scribbling, I covered the entire thing with a coat of barely-diluted black paint, then wiped it off the crayon areas, to create a "resist" effect. The circles are "stamped" with white acrylic paint, using lids off a couple drink bottles. (I have quite a collection of these odd things going; unfortunately, sometimes Pandora finds them, and we're woken up in the middle of the night by the sound of her shooting them across the kitchen tile...) The quote is a rubber stamp- that portion of the card was covered with a clear sparkle glaze, which was done to cover up a bit of a smudge, actually... but don't tell anyone!

These two pieces of paper were just to test out a couple of my newest toys, Heidi Swapp masks... they're cut-out images made of adhesive-backed plastic, and you use them like a stencil (only it's the opposite: the paint ends up around the image, leaving the image itself blank). I just realized this combines some of my very favorite things: books, the color blue, and plants and birds- funny how that happens, even when I'm not trying to do it. These bits of paper will be used for something- not sure for what, though...

This picture is also pieces of 4 x 6 paper, and it's another technique I've been wanting to try , seen in a recent issue of Somerset Studio magazine. It uses torn strips of regular masking tape and torn strips of magazine pages. The strips were attached to the background paper in an alternating pattern- the lighter strips are the tape, and the darker strips are the magazine paper. After attaching them, you get out the acrylic paint, start painting, and see what happens- the colors of the magazine paper are affected differently depending on the paint colors used... I also added some clear glitter glue for added interest, too. It was a bit futzy to do, but I like how they turned out. Here is the pink piece, finished off with a bouquet cut from a catalog and an edging of blue watercolor crayon. Now, I'm off to work on inchies for a swap, and maybe cut a few more pieces of 4 x 6 inch watercolor paper... (maybe I'll even mail some of these, seeing as they ARE postcard size!!)

January 22, 2008

I've been featured! (...and I've been crafty, too...)

My Etsy shop was featured today on Funky Finds, a blog that features and promotes independent crafters and artists!! How cool is that?!? I got an e-mail this morning from Jessica, the author, letting me know... quite a nice change from the spam and junk mail that sometimes makes it into my inbox! She has found some really interesting sellers; when I have time, I'm definitely going to read more of her posts. Now, to the crafting: I made a few new domino keychains... In this post, I showed a keychain with a tiny rubber stamped birdie... I decided that although the birdie was a pain in the neck to cut out, he was so cute that I would turn him into a series... Birdie could get into quite a few adventures, maybe do some travelling and exploring... This is Birdie Flies a Kite- birdie is enjoying the fresh spring air! (we don't quite have any of that here in Arizona yet, here, but hopefully sometime soon...) Find Birdie, and other Crimson Cat goodies, in my Etsy shop.

This is another of Birdie's adventures, Birdie Visits the Seashore. Birdie is keeping his feet clear of the waves, and relaxing on the beach (made from actual sandpaper). The waves and clouds were drawn with marker, and the sun was stamped and cut out. This one will be in my Etsy shop soon, so keep checking!

And now, for something totally different...

This is a 4 x 6 inch piece titled Dead End Road- Collage #1, made last night using various materials, including scrapbooking paper, pattern tissue, and pages from magazines and catalogs glued onto a background of watercolor paper and accented with markers and Staz-On ink.

It was created as part of a new creative venture... I joined a fun and motivating Flickr group started by some fellow Etsians for creating and sharing collage art, Collage a Day. I've never really tried "real" collage, although I guess you could say some of my ACEOs and keychains might qualify as collage, since the definition of collage is: " technique of composing a work of art by pasting on a single surface various materials not normally associated with one another, such as newspaper clippings, parts of photographs, theater tickets, and fragments of an envelope." I have a growing collection of "found" papers, scraps, catalogs, and such, but don't usually use them for this kind of art- Collage a Day will hopefully get me to be more creative with these materials, and actually use some of them instead of just collecting them. Although I did find myself digging through the recycle bin this evening, trying to decide "this security envelope pattern is kind of interesting; can I use it for a craft project??" Maybe this isn't such a good thing, after all... we'll just have to wait and see!

January 11, 2008

sad and neglected- a catching up post

yes, my poor blog, you are sad and neglected... but no more! Wow, it's been ages, hasn't it?? The holidays have come and gone, and my cold took at least 5 weeks to finally leave, too. Tom and I both had some time off over Christmas; vacation and work holidays meant that both of us had vacation from Christmas till after New Year's. We didn't do too much... visited some friends on Christmas Day, spend the day with our friend Dennis enjoying dinner and a movie (we saw The Golden Compass), and took a day trip to Bisbee, Arizona, a copper mining town about 3 1/2 hours south of Phoenix. (we toured a copper mine, which was really neat- I do have some pictures of that to post, eventually!)

The holidays were difficult for me this year, truthfully... It started with having to put Cleo to sleep, stress from lots of overtime at work, feeling under the weather from that terrible cold, and not being able to go back to the Midwest for the holidays... but, the new kittens have started to feel more like part of the family, the overtime is done with for now, the cold is (mostly) gone, and we did talk to everyone on Christmas- so, I'm feeling a little better, finally.

This photo is a Flickr mosaic- some of my favorite photos, put together into one place. I have a tendency to Favorite really cool artwork, cute kitties and dogs (mostly Shelties- imagine that!), and striking landscape photos. You can see the original here- underneath the Flickr photo are links to the original pics, if you want to check any of them out further. This year I didn't even make our Christmas cards; I just didn't feel up to it- not much crafting got done during my vacation either, oddly enough. But, I had to do a major cleanup of my craft room because our friend Dennis came to see the house, so I finally found the desk again! I've been making some new domino keychains; they're a lot of fun to make, and I've actually sold a few of them in my Etsy shop lately. So, these two pictures are two of my newest designs... the Journey keychain above was made with a bit of a vintage atlas- the map is of Bull Shoals Basin, on the Arkansas/Kentucky border. The word was stamped onto a separate piece of paper. The ink ran a bit when I sprayed it with sealer, which actually contributes to a rather vintage/aged feel, I think. I posted a pic of it on my Flickr page, and it's actually garnered quite a few views. (I finally posted it for sale in my shop- hopefully someone there will like it just as much!) This keychain turned out amazingly cute (if I do say so, myself!), and is already sold. I called it Birdie Love Song... It was actually an afterthought, made with a scrap of vintage music paper leftover from something else... the paper was colored with a light blue wash of acrylic paint. I liked the placement of the music and words on the domino, but didn't know what I would do with it till I thought of a bird, and birdsong. The birdie was stamped onto cardstock, colored with pencils; then I cut it out (!) and glued it to the domino, along with the tiny cardstock heart in the corner. I like this birdie, so I think he's going to have some more domino adventures soon! When he does, I will be sure to post them- I am going to try and keep the cobwebs and dust off my blog this year!

September 02, 2007

Newest ACEOs

I got crafty with the paper, glue, and paint again today... over the course of the last week or so, I made at least 10 ACEO backgrounds, and I finished some of them up today. I say "finished up" but it's more of an ongoing process for me- I have to think about the backgrounds for a while, then decide what images I think will "fit" with the backgrounds, both in terms of the "feel" and the colors. Sometimes, I'll even change my mind midstream, and go in a totally different direction- sort of makes it a surprise to see what I end up with!

Spring Symphony #1. for sale in my shop.

Like so many of them, it was not what I had originally planned. The image was a vintage one I found on Flickr; the image is from an 1883 issue of St. Nicholas Magazine. I watercolored it and cut it out; originally I was going to put it onto one of the painted backgrounds I made (pic below) but the colors just weren't right. I think it fit much better on this background. It still looked like it needed "something" which is where the twigs came in. They are sewn on with very thin gold thread. These are three painted collage backgrounds, waiting for their focal images. They were made basically like the journal pages I made in the Art Unraveled class I took with Kelly Kilmer. (as good as I remember, anyway- I didn't take notes during class!) Only much tinier, of course, since they're only ACEO size!

Fly without Fear. For sale in my shop.

When I started this background, I didn't like it at all. Once I finished it, I loved it! Just goes to show you that you have to see things through to the end, I guess. I left a bit of vintage dictionary paper showing in the corner; it is the definition for the word "impunity" which I kind of liked. The colors are much more luminous (? I think that's the word I want) in person, because the entire thing was covered with a light coat of turquoise Lumiere paint, which adds a shimmery glimmer of color to the whole thing. The flying bird stamp wasn't facing the right direction, so I stamped it onto a flat piece of rubber, then stamped it again onto the paper- this switches it around and gives you a mirror image.

Home- Where One Starts From. For sale in my shop.

This background ended up a bit darker overall, with the red and blue colors in the paint I used, so I thought it needed a more graphic image to off-set the background. This clipart house fit the bill, I think! I finished off the edges of both the house and the card with Sharpie marker.