Showing posts with label butterfly. Show all posts

January 27, 2014

so, besides birding...

In addition to birding, I have been doing a little bit of crafting here and there, too. Not much, but some-- I craft a lot more when I'm in a good mood, and the uncertainty of my job situation over the last couple months just sort of 'sucked' the creative spirit right out of me for the most part. (I know that some people craft whatever their mood, or that crafting gets them out of a funk, but my creativity just doesn't work like that. If I'm not in the right frame of mind, then whatever I try do just makes me frustrated, so it's really better if I don't craft when I'm in one of those moods. But enough of my self-analysis... on to the pictures, right?!?)

thank you cards

same basic card design

I only glued the center, so the medallion has a bit of dimension to it

blank card- I love the pink and grey color scheme!
The focal shapes on these cards were all made using my new toy, a Silhouette Cameo cutting machine that can cut paper or fabric using patterns that you design or download from the internet. I've wanted one for a couple years now, and Amazon had a really good deal on it before the holidays, so I finally pulled the trigger on it (it was my verison of Black Friday shopping, lol!). I've only used it a bit so far, but it's pretty cool!!


The machine connects to your computer and the patterns are set-up on the computer screen (using the machine's software) to be cut any size you want, all the way up to 12x12 inches. (it can even be used with vinyl on a roll, so you can even make signs with letters up to 12 inches high.) The paper is set onto a sticky cutting mat to hold it steady and loaded into the machine. Then you 'send' the instructions to the machine which cuts the pattern out of the paper using a teeny-tiny blade. After it cuts the shape, you very carefully 'peel' the paper off the cutting mat, and voila- a really neat, intricately cut shape, without any work at all! (well, not much work, anyway)


Here's the first shapes I cut out of some scrap paper after I got it hooked up-- I wanted to see just how intricate of a shape I could cut. I like the Polaroid frames, and that stem of leaves is pretty cool, too.


this snowflake is about 3 inches across- isn't the detail in the cutting amazing??


This picture shows the machine and laptop in the picture for size comparison's sake. Now, I've been scouring the internet for shapes and designs- there are plenty of people who post shapes for free, or for sale, for those of us who don't want to design our own. It will also cut any font you have loaded onto your computer, too. In addition to cards and scrapping, it can be used for cutting out the parts for assembling 3-D paper projects, too. It can also be used to cut fabric, for craft projects or for quilting. I doubt I'll be doing that, but I do plan to use it for making scrapbook page embellishments.


March 07, 2013

a scrapbook page takes shape-

amid the clutter and chaos that is my normal manner of working on a craft project!  I was trying for the 'artsy, messy' style of scrapping that's popular right now, where you add freehand-cut layers of matting underneath your photos, maybe some misting or splatters of color and ink on the background page, things like that:

Turns out that no matter how hard I tried, I just can't do the 'messy layered' look... it just isn't comfortable for me, design-wise. I can't do things 'crooked and freestyle' at all; I have to have things lined up, and straight on my pages. So, instead of 'messy layers' on my page, all I got was a messy scrapping space on my desk! 


The photos above and below are both of my discards- things I thought I might use on my page, but didn't, or things I did use, and now need to put away. A lot of work for one 12x12 inch scrapbook page and two photos, isn't it?!? lol!!
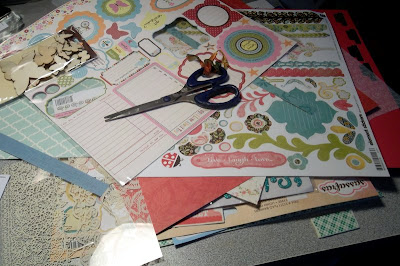

Seems I can't narrow down the choices when making a page without having lots of options to choose from... nor can I decide on a color scheme, apparently, since there's blues, purples, red, pinks, greens, and yellows in the discard pile! And, you can't tell this by the photos, but I don't work very fast, either-- I have to sort of 'ruminate' on my decisions for a while, from the very start of the page. I technically started the planning process for this page a week or so ago, when I tried out a new color of spray ink.  From there, I made two changes in what photos to use on the page, and last night I worked for over two hours on the bulk of the actual 'page design' to crop and mat the photos and design the actual 'page' itself. So, without further ado, here it is!

old-fashioned flowers are the best kind.
I really love this page, even more now that I'm seeing it in the photograph, I think!! (That's a good thing- sometimes I'm not so happy with them after seeing them photographed!) These two pictures are about 10-12 years old, and are of the flowers in my garden back in Illinois. The background is pink spray mist along with some gold ink splatters, which I think turned out really nice, if I do say so myself! (that's one of those techniques I really haven't mastered yet, so it's sort of like gambling to try it, for me... you don't always know what you're going to get.)


This photo is a close-up of the upper left area of the page- it shows how I mix  'new and old' materials on my pages. I'm not consciously trying to do that, or anything- it just happens! The wood veneer butterfly is new (and trendy), the chipboard letter stickers are new (picked up at a clearance store, for a fabulous price!), the blue background papers are at least a year old (from my local scrapbook store's garage sale), and both the green paper that I used to mat the photos and the pink vellum in the background are from my stash (and both of them are at least 10 years old).

This photo shows the lower right area of the page: another wood veneer butterfly (they're just so cute!), and a bit of a screen-printed transparency. I wasn't originally going to use that transparency on this page, but it was laying in the discard pile next to the page, and I decided it would add an extra bit of 'dimension' to the page. I guess this goes to show that some good design accidents can happen out of the chaotic way I work! (this photo also shows a bit of the gold color shine splatters, though the photos don't do it justice at all... trust me, this gold is beautiful, and if you don't have any of it in your stash, go to Michael's right now-- it's by Heidi Swapp, and it's buy one, get one 50% off!) 


May 15, 2011

random weekend pics

busy as a...
(well, I haven't been, really-- the bees have been very busy in the prickly pear, though.)
Ariel, sunbathing ... I'm sure Butters was curled up somewhere napping, too, but I don't know where.
Prescott: what did I do? (I'm not sure, but probably something!!) Bisbee, relaxing on the tile till dinnertime.
these last two pics are of a card I made for a co-worker whose last day at work was Friday. It was sad to see her go, but we'll keep in touch.
closeup of the butterfly punches-- this card was very simply made with two different Martha Stewart punches: one makes the bigger butterfly, and the other makes the medium and the small ones.
(I love butterflies-- can you tell??)
I hope everyone had a good weekend, whether you spent it sunbathing, working, or relaxing!

May 08, 2011

Happy Mother's Day

Happy Mother's Day to my mom, who was always happy with whatever I brought home for her, whether it was a boquet of dandelions, a pocket full of rocks, or an interesting looking plant, leaf, or bug. She let me keep an aquarium full of tadpoles on the dining room buffet or a mason jar of caterpillars on the kitchen counter, and even encouraged me to do these things as long as it led to me learning something new-- thanks for everything you've done for me ver the years, Mom!