Showing posts with label scrapbooking. Show all posts

May 02, 2013

breakfast at the hotel

Early Saturday morning at the hotel, I had to get something (I don't even remember what) out of my car. When I went outside, I decided I had to go back inside and get my camera, so I could get a shot of this (click on the photos to enlarge them):


see him?? look close at the top of the fountain...


here he is closer-- after doing some Googling, I think it might be
a 'sharp-shinned hawk.' (maybe?? I really need to get a new bird book.) 


perhaps he was looking to have his breakfast at the fountain? 
I got too close to him, though, and scared him off. 

It was a long weekend, with way too little sleep, but it was a lot of fun. I might not have gotten much accomplished, but I met some really nice people, and shared lots of interesting stories. That's one of the great things about scrapbooking- it's all about preserving and sharing your stories and memories!

I got all my stuff back home on Sunday, and even unpacked it all already!! Everything is back in its place up in my craft room; now I just need to finish up the layouts I made while I was there. National Scrapbooking Day is this Saturday, so I think Saturday and Sunday might be scrapbooking days for me.  (after a trip to the Botanical Gardens Butterfly Exhibit on Saturday- more photo ops to practice using my new camera!)  And, I might even be ambitious and start a few more projects- there's lots of layout ideas rattling around up in my head.

I'll make sure to post pics of the layouts when I have them completely done! (or at least post what I have done at the end of the weekend, lol!)

March 08, 2013

a couple tricks up my sleeve--


Like I said in my last post, I don't really like things that end up crooked on my SB pages. (Unless they're 'crooked on purpose' that is, but again, like I said, I haven't really fully embraced that style). For me, one of the 'fiddliest' parts of making a scrapbook page is laying down the letter stickers- questions like: how much space do they take up? will they fit where I want them? are they straight? ...you know, that kind of thing. I do have a 'tool' I bought years ago that sort of helps with that; it's a non-stick ruler: you place your letter stickers on the edge of the ruler, get them straight, and then transfer them to your page. Problem is, you can't really see through it, so you don't get a good sense of what your stickers will look like (design-wise) once they're on the page. So, this is my ingenious (and free!) solution to that problem:


I used the plastic from the sticker packaging! High tech, right?? lol!! (and free!)  I wanted to make sure the smaller letter stickers were going to fit in the space above the main word, so I laid them out on the clear plastic packaging left over from the larger sticker letters. Then, I moved the clear packaging around on top of the page, so I could gauge what they were going to look like. From there, I transferred them onto the page itself. (and then, of course, I messed around with them endlessly to make absolutely sure they were straight- lol!) But using clear plastic is a good way to help figure out where you want your sticker to end up without having to stick them down on your page (and possibly un-stick them again to move them).


I also tried an experiment last night, to 'copy' a new product that's trendy right now. Vellum is popular again (go figure, right? it was popular years ago, then fell 'out of favor' but it's back again now!) so manufacturers have been coming out with some really pretty patterns. One of them is a beautiful gold polka-dot vellum, shown here used on a SB page (not mine, btw- the link to the page is below): 

(page image borrowed from the scrapbook.com page gallery)
                                    
This gold vellum is beautiful, especially how it shows the pattern underneath it-- but it's over $1 per sheet, and since it's popular, it's unfortunately out of stock at a lot of places. So I decided to try making my own:


Since vellum is translucent, all I had to do was place a sheet of large polka-dotted SB paper underneath it as a template and draw in the polka dots onto the vellum with my gold leafing marker. Looks pretty good, doesn't it? (Ariel thinks so, anyway!) It's maybe a little more 'handmade' looking than the manufactured paper, but it'll work just fine for me! Now, I just need to come up with a layout to use it on, lol!  

January 31, 2013

and now,some of the 'organize' part of the project:

So, organizing for me- and maybe most scrapbookers or crafters- is an ongoing process: how best to contain and store the supplies so that you know what you have, can get to them when you need them, and can keep the space organized (as organized as necessary, depending on where you work) when you're done? I still haven't hit on the winning combination, but I think I'm getting closer. I also think part of it is knowing how you work, and doing what's best for the way you work. There are so many items you can buy for organizing crafting supplies that it can get overwhelming. If you look at magazines or the internet, you can see countless 'pretty' pictures of creative spaces where everything is sorted by color, or by item type and color, in boxes or jars... and sometimes I wish mine could look like them, but they just don't work for me. 

In the past, I've tried sorting and organizing things into small containers, or little drawers, like the photo below (this pic is from our previous house):

  
(It's messy, but I wanted to point out a couple things- the first is the yellow unit on the left side with the labeled drawers. I sorted little things (buttons, brads, etc) into the drawers, but then I'd have to open 4 or 5 of them to find exactly what I wanted. Some of my unmounted rubber stamps were stored in a large three-ring binder on the shelves above the desk. It might look good for storage, but I'd never use them! The shelves above the desk also hold bins (homemade) that I used for storing my paper scraps in zipper bags, sorted by color (ROYGBIV). Again, after I sorted and stored them, I'd never use them again. The paint-can-looking thing in the middle of the desk was for organizing tools; it had lots of little pockets for holding your pens, scissors, and the like. You guessed it- I'd never use any of it. (or if I did use something, I wouldn't put it back, because it was too hard to find it again.) 

So, my new strategy for organizing is: Categorized Rummaging, lol! I'll explain a bit below...

The tool bin. (it's an ArtBin Super Satchel divided bin
This container holds scissors, adhesive, my most often-used mini alpha stamps, replacement blades for my paper cutter, etc... the things I need for most of my scrapbooking or crafting projects. I've been using the tool bin for a while now, and it seems to work pretty well; I can see what's in it by just opening the lid, and things are well-contained inside it. Obviously it travels well if I scrap away from home, but even when I'm home, I just leave all these supplies in it. That way, there's only one place I have to look for any of these items. And it's clear, so I can see at a glance what's in it (in a general sense, anyway).

Since this had been working for me, I decided to do something similar with my other supplies. No more teeny drawers of things sorted by color, no more boxes that I can't see into so things get forgotten about... I need to see it so that I'll use it, but still be able to contain things (somewhat) so they don't get dusty, or don't get chewed up or dragged around by cats. (don't laugh, they've done that!)

The decorative tape bin
(along with a few stamps that I need to put away)
And hey, there's plenty of space for more tape!! lol!

The memorabilia bin
I bought a number of 12x12 bins at Michael's recently when they were on sale for super-cheap; they don't have the handle like the ArtBin does, but they'll do just fine. This particular one is where I've started to put memorabilia I might want to use for a SB page- various pamphlets, business cards, maps, stuff like that. This container / category is still a work-in-progress, but it's better than where this stuff used to be, which was in assorted bags stuffed on a bookshelf, or worse yet, piled in the middle of the kitchen island!

Shiny stuff-- rhinestones, sequins, and the like.
A lot of people do their organizing by color- all the blue paper, stickers, rhinestones, thread, etc together. That's fine for them if they think like that... "I want to make a blue-themed page so I'll get all my blue stuff out." That's not how I work, though. I haven't figured out what my exact thought process is quite yet, but I know it's not that. So, I sorted through my stuff and took out all the similar things- is it shiny or does it have rhinestones? if so, it goes in this bin. (this stuff will probably end up in a box with a lid, so I can travel with it if needed.)

The 'additional stuff' bin, for want of another term:
border stickers, other stickers, chipboard shapes, flowers, etc.
Other people create their pages or projects based on the manufacturer brand-- they might want to make a page or card using all Echo Park or Studio Calico materials, so they store their supplies separated by manufacturer. I did have some of my stash organized by manufacturer, but again, there would be a lot of stuff I wouldn't ever even look at, let alone use. With my supplies organized into larger categories (based on 'what' it is rather than who made it or what color it is), there's at least some chance I'll look at it and use it on my page, no matter what company made and sold it.

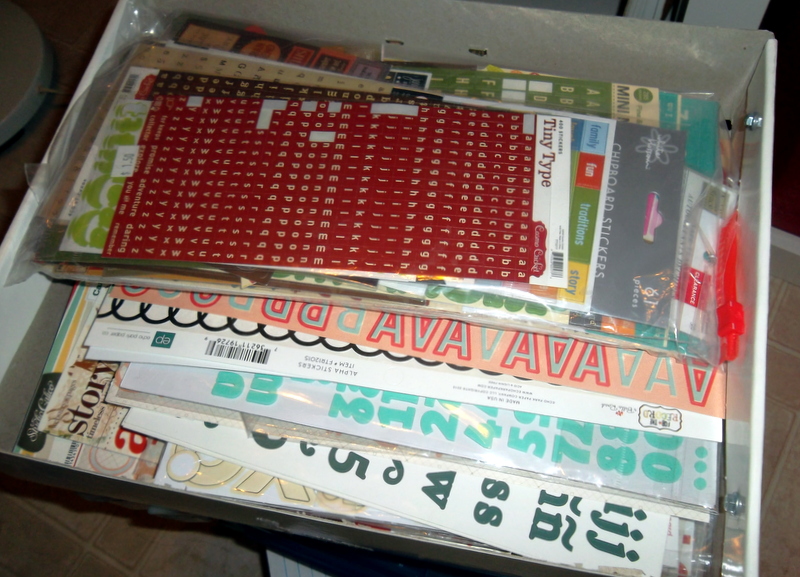
The alphabet sticker box, separated into two
arbitrary categories: 'large' and 'small'
Again, all different colors and all different
manufacturers are stored in the same box.
I haven't really used this new system to make a scrapbook page yet so I don't know how well it will actually work, but I'm thinking it's closer to the way I think and create than the way I used to have things stored. I like 'rummaging' through boxes and shelves when I'm at a flea market, antique store, or estate sale, so I decided to apply the same sort of thinking to my scrapbooking supply storage. 

Journaling card storage: all sorts of stickers, cards, and
shapes that have blank spaces for writing on. (mostly)
In addition to journaling cards, the container above (sorry for the dark photo) also holds my small stash of October Afternoon, Cosmo Cricket, and Studio Calico stickers and cards (right after I said I didn't want to separate things by manufacturer, lol!). But those are my very favorite ones, and this will hopefully make it easier to find them when I want to use them.

There are more categories of things I don't have current photos of yet (patterned paper and cardstock come to mind) and others I don't have completely sorted out yet, like my stamps and inks. I'll take more pictures as I finish the re-organizing process.

One other thing this has shown me about my supplies is that I have alot more of some things than I thought. I would have never thought I had enough alphabet stickers to fill that entire box! That means I don't really need to buy any more until I use some of them, loL! And hopefully now that they're more centrally located, I'll find it easier to do that very thing! Not everything is organized yet, and I certainly wouldn't call this system 'totally' organized (or pretty) by any stretch, but it's a start... and it's a bit of a mind-shift for me that will hopefully improve my creative process in the long run. We'll see how it goes, and whether I need to tweak it some more. 

Hopefully this new method of organization will help me to avoid a work space that looks like this:


(in my defense, this pic is of my space at a weekend long crop where there were no cats. But still, there's only so long that you can work in a space that looks like this- and it isn't very long, lol!)

May 07, 2012

NSD 2012 (first installment)

So, Saturday May 5th was National Scrapbooking Day... I don't know much about the history of this, but I do know I had a really fun time this weekend!! I headed to the Phoenix Scrapbook Cottage after work on Friday, and was messily creative till Sunday afternoon. Yay!! I didn't take too many photos of the weekend, but here are some of the ones I did take. (please excuse the photo quality; most of these were taken at night, and the light wasn't the best so I had to use the flash. And as always, click on any of the photos to make them bigger.)
My workspace, not long after I got started. There were four of us staying the entire weekend, so I had the entire front room to myself (I got there first, so I got first pick of the workrooms- haha!) The front room has three 6-foot tables all butted up together, and by Saturday morning, I spread out onto all three of them. ...laptop, computer, typewriter, photo printer, paper carrier, cardstock, patterned paper, stickers, inks, stamps, ribbon, thread-- you name it, I brought it with me (at least some of it, anyway).
This 2-page layout is the first thing I worked on... I had actually designed the layout last time I was there (in January), but never finished it. I knew I wanted to do hand-stitching on it, and knew it would take a while to design that and actually do the sewing and make flowers that fit the scale and design of the layout... and yeah, it did- like 2 hours! whew! But, I really like how it turned out-- the colors match the prevalent colors in the photos, and the flowers are (very loosely) based on sunflowers, which are a summer-time flower.
This layout was pretty much the only thing I got accomplished on Friday night; I had no idea how long it would take, and it was sort of frustrating me. So, I headed to bed around 10 pm, to get some good sleep for an early start on Saturday.
Not sure if I've shared this layout (unfinished) on here before, or not. The photos were taken last summer when we visited family in IL and WI, and the journaling reads: "It started out as sort of a joke, to take photos of a theme during our trip back to IL/WI... But, it ended up really making me think about how difficult a livelihood farming actually is." 
The flowers and stitching add a nice dimensional touch, as well as a truly 'hand-done' element. I will be doing more hand-stitched layouts, I think. (when I have the time, that is!)
So, Saturday morning I got up bright and early at about 5:45. Why, when I didn't have to?? Well, I did have to-- my brakes had been acting up, and had recently started grinding and groaning... soooo, instead of scrapping at the cottage on Saturday morning, I took my library book, art journaling supplies, and my iPod to the local Honda dealership! Nope, not exactly how I wanted to spend my Saturday morning! (especially since I forgot to take a pair of scissors with me, darn it!)
It wasn't too bad, though- I got the chance to work a bit in my newest art journal (I'll show you more of it later), and gluing, collaging, coloring, and doodling is therapeutic for me, as always. I did get a few funny looks from some of the other patrons in the waiting room, but I've long since gotten over that. 
They had snacks, too-- I got a small bag of popcorn to munch on, as well as snagging a couple extra popcorn bags for my journal!! 
and thankfully, I did have a few things already cut out of magazines in my collage-stuff files, like this topiary... also thankfully, now my brakes work fine!! 


(National Scrapbooking Day- well, weekend, actually- was a lot of fun, besides my personal creating and challenges I found on the internet-- next post, I'll be back to the Scrapbook Cottage to show you more actual "scrapping" since I stayed up till past midnight on Saturday evening! and yes, I'm still tired!!)

May 02, 2012

SB- a look back via the WABAC (or Wayback) Machine

another trip down scrapbook memory lane  via the WABAC machine... remember that segment from the Rocky and Bullwinkle show? I used to love watching Mr. Peabody the dog and Sherman (his boy) travel back in time to experience important events in history. Well, this time, my WABAC machine was set to 10 years ago (wow, I can't really believe this much time has passed since then!!) and a scrapbook layout I made about some of my house renovations. (click on any photo to view it larger)
My first house was a bungalow-type cottage that was built in the 1920s; I was the third owner (?I think- second or third, anyway), so it hadn't been updated at all, which I liked-- the woodwork was all original (no paint), and the house retained that homey, vintage character that I was looking for. One thing it did have, unfortunately, was ancient berber-type carpeting in the living and dining rooms that had been laid over the original hardwood floors. I didn't know how exactly to go about removing it, but knew I wanted it gone, so my parents and my sister helped me out. They all came for a weekend of very hard, very dusty, dirty  work to remove the carpeting and refurbish the floor underneath. And, of course, I had to document it in my scrapbook! 
At the time, I was still doing "Creative Memories-style" scrapbooking which involved white page backgrounds, matting the photos, and very little, if any, patterned paper. I thought I was being so 'style-forward' when I chose to use the tags, jute, and the handmade paper behind the title block- lol!! I actually chose it because the texture and colors in the handmade paper reminded me of the (crappy, messy) backing underneath the carpet that we spent hours scraping off, by hand. And of course, my title letters were traced, one by one, from a stencil and then colored in with markers- waaaay before the era of self-adhesive cardstock sticker letters!! 
Although it does sort of make me laugh, now, from a scrapbooking style standpoint, I am so glad I have these pages, so I can look back at the improvements I made to my little house while I was there!! (and thanks again to Mom, Dad, and Judy-- I really couldn't have done it without you guys!)


I do like looking back at my scrapbook pages- after all, that's why I do it! (well, one of the reasons, anyway-- playing with the pretty paper and cool supplies is lots of fun, too!)


March 12, 2012

in the works...

so, here's a few random things that have been in the works:


1) My scrapping room is finally evolving into its (hopefully) final form. It's about time, too, since we've lived here for, oh, over two years now- LOL! I've never been very happy with the arrangement of the desks or the amount of light on the work spaces, and I've moved the furniture around at least 3 times, but I think I'm finally close to getting it how I like it. (I used to do this when I was little, too; I'd totally rearrange my bedroom at least once or twice a year- remember that, Mom?)  


Anyway, back to my current issue: I usually end up working in this room late into the evening, so decent light is a must! I have one decent drafting-type light on the main desk, but the only light the other work surface (which is our old kitchen table; how's that for re-purposing?) received was from one of those clip-type lights you can buy for around $5 at WalMart. Not exactly good lighting for actually seeing what you're doing! (and, since the desk was usually piled full of junk stuff when I wanted to use it, I needed another work surface for actually working at.) Tom just installed track lighting in his music room (lighting left over from our first apartment), and he suggested getting the same thing for my crafting space- that way, I can direct the light wherever I want it: brilliant!! (Of course, the room now needs to be cleaned, since the better lighting shows just how messy it actually is- please disregard the mess for now, and focus on the lighting!)

(once I get the shelves re-arranged, I'll take some close-up pics of the items on them to show you...
I have a pretty eclectic collection of stuff up there.

2) A couple new scrapbook pages, with more on the way. I recently signed up for a workshop on the scrapbooking site Two Peas in a Bucket, and have finally gotten back into the groove of scrapping. It's odd; my scrapping mojo comes and goes, and when it goes, it takes me quite a while to find it again. But for now it's back, and I'm taking advantage of it while it lasts! The class is The Hitchhiker's Guide to Scrapbooking, a 5-chapter course on scrapbooking taught by Shimelle Laine, with a humorous nod to Douglas Adams' classic book, Hitchhiker's Guide to the Universe. (which I need to read again, so I can get all the 'in' jokes that I think she's added into the class content.) The course is chock-full of handouts, ideas, videos, a private message board, 42 example scrapbook layouts, and tons of information, and so far I've made two layouts with ideas for plenty more! Here's my first two, both using some pretty old pictures from my pile of unscrapped photos:
Both layouts are about the flowers and flower garden I used to have back in Illinois. I spent alot of time gardening, but that was in a different climate, and before we had 5 pets and a house to take care of! 
(and before we lived in a desert- lol!) 


3) not so random, but spring is definitely in the works here in AZ! The high temps have been in the low 80s, the hummingbirds are extra-busy, and there are more hints of green appearing in the backyard grass. (the dogs are trying their darndest to find the greenest shoots to graze on... apparently they're confused and think they're sheep, rather than sheepdogs?!?) I guess they like a bit of salad with their dinner now and then- haha!


4) another random thing in the works for me isn't quite so fun: this Wednesday, I'm going to the endodontist to have a root canal re-done... re-peated... whatever the correct word is for that process-- Not fun!! But, neither is having an infected tooth, so I know it's best to get it fixed sooner rather than later, before it becomes more serious. 


5) a more-fun thing I have in the works is some cute Easter cards: I have the idea; I have the supplies; I just need to put those ingredients together and make them. (once I pick up all the crap straighten my desk, that is.)


6) one more fun thing in the works is a weekend scrapbooking retreat in May at the Phoenix Scrapbook Cottage, over National Scrapbooking Day weekend- it's the cottage's one-year anniversary (already!), and they're having special stuff for the weekend scrappers: door prizes, dinner provided, and other assorted goodies. Since they were instrumental in getting me back into scrapping again, how can I pass that up? (answer: I can't!) So, I hope my mojo stays around until at least then-- or at least, it better not go very far, so I can find it again by May! 

February 26, 2012

my scrapping style evolution-

I've been scrapping for at least 8-10 years (I don't really know for sure), and my style has evolved and changed over the years... it's pretty interesting to look at the difference from some of my older pages to more current ones! 
I started out using Creative Memories strap-hinge albums, and scrapping my pages in the 'Creative Memories' style... little or no patterned paper, white backgrounds, lots of stickers as embellishments, and borders / blocks for embellishing and journaling. 
Don't get me wrong; I'm glad I took the photos and scrapped them... but looking at them now, I don't really think there's much 'design sense' on these pages; they're just blocks of photos, etc. placed sort of randomly on the page. On the page above, I used letter templates to make my titles; I traced the letters and numbers individually, then colored them in with marker- talk about time-consuming!
Like so many scrappers of that era, I also cut some of my photos into shapes- luckily, I usually stuck with ovals or circles, rather than going crazy with stars or other shapes, like some scrappers did! And of course, every photo had to be matted (another 'talk about time consuming' thing). I did use patterned paper sometimes, as you can see above. I vaguely remember the scrapbook store I used to shop at, back in Illinois-- all the paper was separated by theme (baby, travel, birthday, etc) and the growing trend was to use themed paper that matched your photos. 
I also got into a new trend in page layout design in the early 2000's, with color blocking templates. (I think I even still have some of these templates, although I don't know why I kept them, since I haven't used them since at least 2005!) I do like how this particular layout turned out, actually, but color blocking like this required a lot of photo cropping and measuring (which I'm not all that good at). 
I went all out on this page and made an origami bird to go with the theme of this layout, which was a visit to a Japanese garden with my parents. (although you'd never know that, since I didn't leave any blocks on the page to include journaling!) The origami bird gives a tiny bit of dimension to the page, but my pages were mostly flat when I first started scrapping.
Here's a page I did last year-- it's sort of like the color blocking layout above, although it's much more loose and collage-ish in style, and even includes dimensional things such as ribbon, brads, and charms. I think the fact that I do art journaling has influenced my scrapbooking style; it's not quite so rigid any more. (in addition, this series of pages documents an art retreat I attended last year, so I wanted to emphasize that quality in the page design.) 

I also stopped using the 'strap-hinge' style album, since it was pretty rigid in terms of the page order- you had to glue the papers right to the pages, and couldn't rearrange them once they were in there. This was way to restrictive for me since I now like to scrap 'what I want, when I want' and not feel 'forced' to scrap what was next in order chronologically. I switched to 3-ring binder style albums so I can slip the pages into page protectors and re-arrange them however I want them.
I think the fact that I now take digital photos has also influenced my scrapping style- before, I somehow felt I 'had' to use all the photos I took since I paid good money for the film and for developing them. (Or at least to use a lot more of them than I do now, anyway!) 

Now, I take so many digital photos, I couldn't ever hope to scrap them all-- this has been helpful, actually, because now I can pick out the few (or the one) that best captures the feeling, mood, or event, instead of trying to cram all of them onto the pages just because I took them. On the page above, I actually used a photocopy of my own artwork as the background paper, and tried to capture the colorful, chaotic feel of the photos with the papers and colors I chose.
I also scrap things other than 'events' like birthdays, holidays, or special events... the photo above is one page of a layout I did that with photos of graffiti I took on a day out last summer in downtown Phoenix. I wanted to echo the graffiti-feel of the photos with the page layout, in the ink splatters and the gray / cement colored paper I chose. This layout was done for no other reason than to showcase the photos, and try a few new techniques.
While I don't love some of the details on this layout (I fussed with it longer than I should have), I think I did the photos justice with the layout I made, I learned some new techniques that I like, and found some that I don't like so much. And it taught me a lesson that sometimes, I should just 'leave well enough alone' with my art. But it also showed me that I can get over my sense of perfection and that 'not-perfect' is perfectly fine.
I still do 'event-based' layouts if the photos call for it; the 2 pages above are from a trip we took to Las Vegas in September 2009. I just scrapped these pages a month ago, actually-- yay!! for scrapping out of order, and for only scrapping the photos I feel capture the moment the best. I'm also putting my opinion and feelings onto the pages more than I used to (they're my scrapbooks, after all!) so these pages record my feelings about Las Vegas, not just the where-what-who-when type of things. 


I can see a change in my scrapping style over the years, although I don't think I really have a 'signature thing' that defines my style-- I still do color blocked layouts sometimes; I sometimes still do who-what-where-when journaling; I still use page borders and stickers occasionally... I may even cut a photo into a shape now and then, although I'm not exactly sure about that one! 


Thanks for taking a walk down my scrapbooking 'Memory Lane' with me; has anyone else's scrapping style changed over time? I'd love to hear about it!


February 07, 2012

a couple 'real' scrapbook pages!

and now, for a few 'real' scrapbook pages, to go along with my latest Project Life layouts! I want to keep up with Project Life to have a slice of our 'day-to-day' along with random things, but I still do like a well-designed (or not, lol!) 12x12 scrapbook layout. I finally decided to scrap photos of a Labor Day weekend trip we took to Las Vegas in 2009.

I decided to include a couple 'on-the-road' pictures as sort of a 'title page' for this section of layouts-- This was my first view of Joshua trees; they remind me of something out of a Dr. Seuss book! The picture of Tom was taken right over the state line into Nevada; I was sort of amazed to see the poker machines right in the gas station, but I guess when gambling is legal, everyone has to take the opportunity to get some $$ out of it.

this is a close-up of the upper right corner; the stickers are October Afternoon's Boarding Pass line of papers; it's full of really cute travel-themed things. I'm not really 'good at' that whole 'layered embellishment' thing that's popular right now, so this is about as layered as I get on my pages.

this is a picture of the entire 2-page spread. I got the background papers and stickers (Las Vegas themed) at a scrapbook store we stopped at on our way into town... yes, of course I planned that, haha!! The scrapbook store was our first stop, actually; I found out where it was before we left, and we planned our route accordingly. (Tom was pretty nice to accommodate that, for sure!) And since then, these papers and stickers have been knocking around in my craft room, so it feels good to finally use them, before they got lost forever (in the abyss).

the left-hand side: Since this paper is one of those 'photo' designs, I didn't want to cover up too much of the famous 'Welcome to Las Vegas' sign (besides which, I didn't get a good picture of it, myself). This page is a couple pictures of 'people we met' including a couple impersonators on the street, and Tom getting to meet Corey and Chumlee at the Gold & Silver Pawn shop (which was pretty cool, by the way!). It also includes a photo I took of the street pretty late at night, still filled to the brim with cars and people. 

the right-hand side: again, it's a pre-printed themed paper, so I didn't do much embellishing. This page includes selected photos of things on the strip; my take on Las Vegas was that it was crowded, noisy, dirty, and pretty much 'all for show' so that's what my layout reflects. The photos are all 'fake' things: a fake volcano, fake Paris, fake New York city, etc. If we go back to Las Vegas again, I think it will be to see a show or to see more of the city / area than just the strip... neither of us gamble, and neither of us like large crowds, so spending time in and around the casinos on the strip is kind of pointless.

This layout is one of several I plan on doing to showcase some of our favorite Christmas ornaments. Both Tom and I have a collection of ornaments from before we met, and since we've gotten together, we've started buying ornaments when we go on trips. It's a really nice way to remember the trip when we're decorating the tree. This layout is based on a Scrapbook Generations Sketches for Scrapbooking sketch that I modified slightly to accommodate larger photos. At first I didn't really like the gold paper I used, but after adding the stars, I do like the way it turned out.


A closer look at the left-hand page-- the stars were cut on the Cricut electronic cutting machine; I don't have one of these machines yet, but the Scrapbook Cottage has one, and my fellow scrappers had quite a selection of cartridges with them for the weekend. They were nice enough to let me borrow them to cut whatever I wanted. The star design is from a military-themed cartridge of shapes; in addition to soldiers and planes, the cartridge included some really nice stars, badges, fireworks, etc. 

An even closer look at the page- the journaling strips I included on this page. I hauled my typewriter with me to the cottage for the weekend, and I actually used it a lot for journaling! Since I write kind of big, I really like being able to include more text, and the 'coolness factor' of the vintage typewriter hasn't worn off yet... lol!

January 29, 2012

I should be asleep right now...

...because I haven't gotten more than 5 hours of sleep the last couple nights-- this weekend I stayed at the Phoenix Scrapbook Cottage, and who can sleep when there's scrapping to be done and Diet Mt. Dew to drink?? (you think one thing had anything to do with the other? haha!!) Anyway, I didn't take many pictures, and most of the ones that I did take turned out crappy, so they will be re-taken tomorrow afternoon. But, here's a little of what I worked on:
 this is an addition to the Christmas week spread in my Project Life album... I wanted a way to save a few of the Christmas cards we got, so added them in a couple different ways- above I've used a 6x12 page protector; below I added a couple cards into the album just by punching holes right in the cards.
 I also added in an 8x8 page protector, and made a collage-style page with snips and pieces from all the cards we received. I've seen Ali Edwards do something similar before, and really liked it.
 (please excuse the slippers I'm wearing in the photo above- but you gotta be comfortable when you're crafting all day and all night, right?!?)


and as a refresher, above is the spread before adding in the extra page protectors. I really like this approach; it's a good way to add in more 'things' without feeling like I have to stretch the week into two entire 12x12 2-page spreads. It's probably just a psychological thing, because I know there's more than just the 2 12x12 pages of stuff there, but they're smaller-- so it works, in my brain.

This is a horrible photo, but it's a still photo from the movie Mona Lisa Smile. I was watching it on my laptop during a break from scrapping. The movie is decent (free-spirited Californian takes on the conservative mid-century view of 'the woman's place in society' at 1953 Wellesley College), but I absolutely LOVE the clothes in this movie. Every outfit-- I want to have the entire wardrobe in my closet! I really like her shirt-dress and sweater combo here, and I believe she's wearing a squash blossom silver and turquoise belt here, as well. I started noticing small things about people's outfits, like the fact that all the earrings are clip-ons, and the fact that Julia Roberts' character wore this super-cool silver and turquoise jewelry throughout the entire movie. Love it, love it, love it!! (I also found another piece of silver and turquoise jewelry to add to my own collection, at another local estate sale- I'll take a photo of that tomorrow, too!)