Showing posts with label scrapbook layout. Show all posts

September 10, 2015

Labor Day weekend crafting--

I did have a chance to do some scrapping over the Labor Day three day weekend; here's my latest scrapbook layout, using the walk in the woods photos from a couple posts ago. You can either just scroll through and admire the photos (click for larger) or you can read the text, where I explain a bit about my process of making the layout.


I had about half again as many photos printed, but I just couldn't get them arranged the way I wanted, so I had to make some editing decisions-- I took out the ones that were too similar, and a couple that just didn't make my cut from a photo design / color perspective. I decided to feature all the close-up photos on one page, and chose two of the 'regular' photos of the woods to use on the other page. I had originally cropped all of them in rectangles and squares with straight edges, but I ended up not liking how that looked so I got out my old-school circle cutter and my corner rounder. 

I think cutting the raspberry and thistle photos in a circle echoes the shape in the photo, and the rounded edges on the rest of the photos softens the lines and makes it a bit more relaxed or organic feeling. (hopefully? that's what I was going for, anyway, lol.)

Below is the left-hand page:


This page is based on a Scrapbook Generation 1-page sketch, with a few changes. The papers I chose are actually a mix of papers-- some from a Pink Paislee Christmas paper pad (the large polka dot, the green horizontal strip, and the blue zig-zag) and some other papers from my stash. I don't scrap Christmas or winter pages very often, but when I saw that paper pad in the store, I knew most of the patterns would be good for 'regular' pages, too!

The next photo is the right-hand page (sorry for the bit of glare from the upper left photo):


I extended the one-page design across the two-page spread by doing the 'opposite' background paper arrangement on the right-hand page. One other small detail- I decided to ink the edges of all the papers to get rid of the white edges and make them blend a bit more with the darker cardstock background. It was time consuming, but I think it was a good decision.

bottom right embellishment cluster: cork circle, enamel dots,
vellum phrase, decorative brad, pink sticker, and a stamped word.
Once I get all the background papers and photos attached, I start looking for embellishments for the pages. (this post shows a picture of the 12x12 Iris cases that hold all my embellishments- tags, brads, enamel dots, stickers, and all sorts of rhinestones, wood veneer shapes, etc.) Page embellishments are little bits and pieces that (hopefully) lead your eye through the layout and reinforce the shapes and colors on the page and in the photos.  

the title embellishment cluster: more cork, wood veneer
camera, gold brad, layered paper, vellum phrase, a bit of
pink, more enamel dots, and another stamped /cut-out word. 

left-hand embellishment cluster- the same combination of
items: brad, cork, enamel dots, stamped word, stripes, and 
blue, pink (in the brad), and gold,  which I used in each area. 

Choosing embellishments and deciding how to arrange them is a slow process for me, but it's also kind of fun-- looking through my Iris boxes to see what jumps out at me that could be used on the page, and deciding how to arrange the small items to emphasize colors in the photos and on the page. I decided to use pink in the embellishments so the raspberry photo wouldn't look so out-of-place, since otherwise it's the only pink on the page.

Embellishment clusters sort of 'lead' your eye across the layout, too, so I laid them out in a 'visual triangle' arrangement-- since we read from left to right, your eye goes from the lower left up to the title, then across to the right-hand page to the pink in the raspberry photo and down to the lower right-hand corner. (again, that's what I was going for, anyway!) And, even though it took a lot of effort and arranging on my part, the result I was trying for was a loose, collage-style layered look. (I just need to be a bit more decisive to make the process go quicker.)

Oh-- and after all that was on the page?? That was when I decided to add all the gold splatters with Heidi Swapp colorshine spray. I had to cover up the photos and embellishment clusters so I wouldn't get gold splatters all over everything. This is definitely a design decision better done at the beginning, for sure!! 

And now, a switch from scrapbooking to card-making-- which I don't do all that often any more. I made four altogether, but can only show you one right now, since the other ones are on their way to people who I know read my blog, lol!

it's five layers total, not counting the card base (which is not
nearly so bright in real life... my phone camera didn't capture
the color correctly, and I couldn't edit it back to the true color.)
I pulled some tags, die-cuts, and other things from my stash, and started layering things together just to see what worked. 

The butterfly is stapled to the pink tag, and everything else is glued / tucked underneath on the round journaling tag. The glitter on the butterfly wings was supposed to just be polka dots, but-- me and glitter glue? not a good mix-- so after a bit of a glitter glue accident, I had to cover up the evidence by outlining the entire thing. 

I have a slight obsession with tiny alphabet stamps (I only own 5 or 6 sets of them so far, lol!) so I used one of them to stamp the 'hello' on the blue banner. 

I hope the recipient likes it! 

I have a 12-hour SB store crop coming up in October, and at the end of September I'm going to the Scrapbook Expo in Mesa-- I haven't attended one of those in years. I'm taking two classes, as well as attending a 16-hour crop, so I'd better get busy editing and printing photos, and designing layouts! :D

March 31, 2015

Calvinball- SB layout share

close-up of chipboard embellishment
Whenever I scrap, even if I get the page started fairly easily, there's usually some detail or part of the page that just seems to take forever to get done. If there's buttons on the page, I need to put thread in the holes; if there's sequins on the page, it takes me forever to decide just where to put them-- things like that. I always seem to think of something that takes extra-long to do, or is extra-detailed.

As an example: the idea for this layout came together really quickly; I saw a layout in the Calvinball gallery here, and knew I wanted to scraplift the page design. I even found the photos I wanted to use and chose the papers I wanted fairly quickly. Then, I had to decide how to embellish the page. I settled on chipboard swirls- like the one you see above. Only problem was, the chipboard swirls I had were silver and glittery. And that wouldn't work on my page, at all!

And what did I do? I tried to find something else in my stash of stuff that would work, but once I get fixated on something like that, nothing else looks quite 'right' to me. In the end, it took me a couple hours altogether, but: the chipboard swirls were gessoed, painted brown, then sponged with antiquing gel, all to make them fit with the vintage look of the papers I chose. 

So, here's the final completed page (click to enlarge):


About an hour for most of the page; plus about another hour all together for the chipboard. But the chipboard swirls look perfect! (well, now, they do, anyway-- lol!)

This page showcases one photo (2 copies) of a Costa's hummingbird that I took a couple weeks ago when I was hiking. I happened to see this hummingbird landing on 'his' tree-- hummingbirds pick a vantage point to land on and sort of 'survey' their territory-- so I set up shop right next to this shrub to see if I could get any decent photos of him. I managed to get a few 'okay' shots, but nothing too spectacular. An older gentleman saw what I was doing and waited for me to finish so he could get a few shots of him, too. He said he photographs hummingbirds at the Botanical Gardens and can sometimes take two or three hundred photos and only get maybe ten really good ones out of the whole bunch. So now, I don't feel quite so bad! 

 For this page, I printed the photo in color then turned it to sepia-toned and printed it again. The sepia photo shows a bit more detail of his feathers and how many (tiny, tiny, tiny) feathers he actually has-- which is crazy, considering these birds only weigh 2-3 grams total!! With a wingspan over 4 inches and a total length of 3.5 inches, they're practically all feathers! 

I'll post a few of the better photos I got of him in my next post; meanwhile, you can click HERE to see what a Costa's Hummingbird looks like close up. 

March 30, 2015

more scrapbooking-- layout share: BFF's

and, an apology-- I realized that one of the layouts in the last post was one that I had shown you before-- sorry about that! I guess it was because of staying up really late... :D


Valentine's Page Kit

Last time I scrapbooked at the Scrapbook Barn in Gilbert, I got a page kit as a make-a-take, to make the page above. It's a nice-enough page, and all the supplies for it were included. In the course of the last couple weeks of scrapping, I used the word paper banner for another page so I needed to make a couple modifications to the kit to actually use it. When I looked at my photos, I decided to take my page in a slightly different direction... 

corrugated heart with my page title: bff's.  (I dispensed with the
computer printed title in the kit in favor of glittery Thickers)
So as you can see from the photo above, I decided to make a page about Prescott and Bisbee. They really are BFF's... wherever one is, the other isn't far away. After Bisbee had her teeth cleaning and extraction, she had to stay quiet for a week so she could heal.  Keeping quiet was tough on her, but it drove Prescott crazy that they couldn't play together! When one of them is inside and the other one is outside, the inside dog stands in the doorway and whines... and so on.


The finished page
I used some of the words from the leftover banner paper to add to my now floral banner, moved the heart title, and used two larger photos instead of one large + 3 smaller ones, but otherwise, the page was made pretty much like the kit. I think it turned out pretty nice, it's a topic I've wanted to scrap, and now I have!! 

(Calvinball for the win!)

March 29, 2015

a few more layouts to share

It seems like I always have more ideas for SB pages in my head than I can ever get completed (that darn job, and having to make a living, lol!) but Calvinball has been the kick in the pants I've needed to actually make some of them and get them completed.

Home Improvement- my house in Round Lake, IL
These pics are from 2003, and I have had this layout idea
in my head for at least 5-10 years. 
 I have been carrying that paper-pieced dump truck around with me for at LEAST the past 8 years; I made it myself, from scratch, a loooong time ago. I'm pretty amazed I still knew where it was!


My Scrapping Essentials-- a visual representation of all the things I
need (or like to have, anyway) for scrapbooking.
 This page is another one that I started at least 5-7 years ago- I drew and cut out the pie chart by hand, and never got any farther than that. I finally finished it! My Scrapping Essentials include: snacks and soda (Diet Dr. Pepper, Raisinets, and Hot Tamales are my current faves); space to work in; stories and photos; paper (I looove patterned paper, and have more of it than I will ever use- it's just so pretty!); music or TV to listen to; inspiration; and embellishments. That's the fun stuff- glitter, brads, sequins, punches, enamel dots, etc.

The 'embellishment' section of the pie chart-- I kinda went overboard
when I decorated this piece, but I do like the entire page.


Quite often, I have photos that don't really 'fit' in with anything else to make an entire page or layout about... I decided to make a page that was just 'random' photos that I like for whatever reason. 

Close-up of the 'caption' section of the page- typed with my estate sale typewriter.
(See below for the entire page.)

Random Snaps, entire layout--
another one that I started ages ago.
I cut the glittery polaroid-style frames from a patterned paper and temporarily stuck them (empty) to a background paper when I first got the idea. The page stayed like that for about 2 years, till I finally decided I was going to make this page no matter what, so I added more papers, and chose photos for it. I do quite like it-- there's plenty more 'randomness' in my photo files, so I'll probably make a page like this occasionally from now on.

The photos on this page truly are random-- a rooster I saw when I was bird-watching at the Riparian Preserve (you can't get much more random than a rooster at a wildlife preserve, right??); a snail I saw right outside the front door where I work in Phoenix (snails living in the desert somehow still seem 'wrong' to me); us up in the hot air balloon; the restroom sign at the Honolulu airport (I loved that that they have the symbol wearing a dress and lei); and a 'shadow selfie' I took a few years ago at Mom and Dad's garden.


I've got more pages done that I'll post soon, but right now it's getting hot out here on the patio (it's supposed to be in the mid-upper 90s all week- yuck!), and there's scrapping to be done!

March 28, 2015

my workspace-- and a Calvinball progress report

one of the topics being discussed in the Calvinball forums, like with all scrapbooking, is "what does your workspace look like?" Here is my workspace in the middle of a page... I always say I think I conform to the laws of scrapbooking physics and the universe when I fill up all available space with stuff. Sort of like the saying 'Nature abhors a vacuum.'

(I abhor vacuuming, too, but that's a different topic, lol!)

in the middle of working on a page. This table is pretty big (it used
to be our kitchen table) but there seems to never be enough space on it.

my elfa shelves, directly to the left of the table.
 These elfa shelves (from the Container Store) have been in every craft room I've ever had. They've moved everywhere we've lived, and this is the fifth room they've lived in. I love them! You can rearrange the brackets to whatever shelf height you need, and there are different depths of shelves available. The very bottom shelf is the newest addition, when I realized I still had hanger space available. It's not a large space, but it's perfect for holding my post-it notes, paper trimmers, and a few smaller things that I was keeping right on my desk before.

Those four 12x12 Iris boxes hold: 1) small letter stickers, 2) my Thickers, 3) journaling tags and label stickers, and 4) shaped stickers and border stickers. This way they're easily accessible and I can rifle through them right when I want. I also have 12x12 Iris boxes for bling / rhinestones / wood veneers / chipboard shapes, and one that holds all my stencils/masks. I have tried other ways of organizing my supplies, and this way seems to work the best for me of all of them so far. Plus, since they're plastic boxes, they're portable when I go to a scrapbook store crop or my 3-day hotel crops.

my stack of completed Calvinball layouts so far
So far this month, I've made 15 scrapbook pages (counting both pages of a 2-page layout individually). That's not much compared to some people-- there are some very prolific scrapbookers out there-- but for the way I scrap, it's tremendous. It's been a lot of fun so far, and I can't wait to do it again! (maybe not soon, but counting points for doing certain things on a layout makes it more fun to use different supplies and techniques that I wouldn't otherwise think about. 

Read more about Calvinball here: Calvinball at Get It Scrapped and check out more Calvinball layouts in their gallery, here.

March 15, 2015

Calvinball update- "Seed Catalogs"

 (sorry in advance for the horrible yellow tinge to the photos- I've been scrapping pretty late at night, and the lighting isn't the best for true-to-life photos.)

that being said, the positive thing is that I've been scrapping! This Calvinball contest is getting me to complete layouts I've had halfway done for ages, or ones that have been just marinating in my head... (attending a 12-hour crop at the local SB store yesterday helped, too... haha!)

This layout has no photos at all, and is one I've wanted to do for years but couldn't figure out quite 'how' to do it. I got the vintage seed catalog cover images from the internet, and left myself plenty of room for journaling my memories of gardening and the excitement the seed catalogs would garner when they came in the mail. (Sadly, Mom says they don't send print catalogs anymore-- it was always fun to read through them, read the cool names they came up with for the new varieties, and see the pictures people sent in of their 5-lb tomato, 150-lb pumpkin, carrots that looked like faces, etc.) 

This page talks about the kinds of things I remember eating from the garden-- rhubarb, strawberries, fresh peas, green onions, radishes, apples, currants, plums, and pears from Grandma and Grandpa's yard... and Mom's process for selecting what new seeds were needed by going through the box of left-over seed packets she had stored in the kitchen cabinet from the previous year. 

this page used only patterned paper, journaling cards, and vintage buttons

Once I got that page done, I realized I hadn't said everything I wanted to so I made another one (see it below). I started out with a 6x12 yellow background and added canning jars that were cut out from a different piece of patterned paper. I added the canning labels from a third piece of paper and started writing. Again, I didn't have enough room... so I added a 3-inch strip of lined paper to the right side of the layout to give myself plenty of room to write. 

The second page talks about my memories of helping out in the garden, starting with helping to plant the seeds in the spring (and putting the seed packets on a stick at the end of the row so we could remember what was in each row), thinning out the plants when they came up to give them room to grow bigger, pulling the weeds, and picking the vegetables when they were ready. 

There was nothing quite like going out into the garden with a bowl and a paring knife to pull the first green onions and radishes from the garden, then eating them at dinner only 5 or 10 minutes later, or picking a dozen ears of sweet corn, taking off the husks, and dropping them right into the boiling water to have that 'just picked' freshness and sweetness that didn't even need butter.

cutout canning jars for adding my journaling, and more vintage buttons 
This page also talks about how grateful I am to have had the opportunity to grow up the way I did: to learn how my food is grown, and the effort and work that goes into getting food for your table and preserving it for the winter. So many people nowadays don't have any idea of the labor involved in getting that bunch of green onions to the grocery store, or what type investment of time, effort, and faith / hope in the weather and growing conditions you have to have to be a farmer, or just to cultivate some of your own food. I am truly grateful I had that experience, and that my mom and dad (I love you guys!!), by giving me the experience of working outdoors in the garden, instilled a love of plants and nature in me that I will always have. 

Even though I still don't like cooked peas, lol! (private joke-- I hate cooked peas, so I would always get a small bowlful of raw peas instead of having to eat the cooked ones... )

This post took way more space to write than I thought, just to talk about one layout. (but it's worth it-- it's a layout I really like, even though there are no photos on it at all.) So keep your eye out for more Calvinball scrapping posts soon! And, I went hiking last weekend to see some of the very ephemeral spring wildflowers we have here in Arizona-- the flowers were gorgeous, I got some fresh air, and I got a few good pictures out of it (along with a bit of a sunburn!), so I'll post some of those photos soon. 

March 02, 2015

a quick post-and-run!! Calvinball 2015!!

I apologize for the crappy color quality of these photos- they were all taken pretty late at night in my scrap room. Yes, I still do scrap (occasionally), and hopefully I will be scrapping a lot more in the next month or two! I signed up to take part in a fun month-long scrapbooking challenge called Calvinball, on a scrapbooking website. 

Do you remember the comic strip Calvin and Hobbes? (I do, since I grew up in the 1980s... it was one of my favorites). Calvin and his stuffed toy tiger/best friend Hobbes  would play Calvinball, a game where the rules were made up as you go along. This scrapping contest is for the entire month of March, to encourage fun, a bit of smack-talking, and scrapping. The rules change as you go, and you get points for making layouts, cards, posting about Calvinball (one point for me, haha!!), and bonus points for meeting scrapping related challenges- like a page with more than 3 photos, for example, or a page using specific supplies. 

If you'd like more information about Calvinball, you can go to the Get It Scrapped website and read more about it-- click here. Come join in! Anyway, to the layouts-- they were photographed late at night, hence the crappy colors. I did what I could to fix it, but really would like to re-take them sometime. (after Calvinball ends, when I have more time, lol!) 
--click on any of the photos to make them larger--

A layout about my scrapping essentials, which include patterned paper, inspiration, photos and stories, and Diet Dr. Pepper! This page has been partially finished for at least 1 1/2 years, and I never would have finished it without this contest. yay, me!! :D

A page with a pretty nice photo of Ariel, hanging out on 'her spot' on the back of the couch, looking out the window. I always wonder what she's thinking, if anything... watching the birds (does she think she can get them?), or is she just wondering when dinner will be served?

The  embellishment area at the top right- sorry for the glare; that banner is made of plastic. The letter stickers are teeny, and have to be at least 2-3 years old. (yay, me!! for finally using up some of my older supplies!)


This layout showcases photos of our Saguaro cactus's very first flowers!! We wondered how many years it would take; we bought it in 2006 when it was 5 feet tall, and in June 2014, it got its first flowers! (a whole three!) I did the best I could trying to get pictures of them, but the Saguaro is at least 10-11 feet tall, so it was kinda difficult-- I didn't want to fall into the cactus while I was doing it. 
larger photo, left-hand page

larger photo, right-hand page

and with that, I'm off... I want to see if I can sneak in at least a few minutes of scrapping before I head to bed! I'll be back soon, with more photos.

(and sadly, we haven't seen the owls anytime recently... Tom says he's heard them occasionally, so maybe they're still in the neighborhood- I hope so!)


January 16, 2015

hey, I'm still here!! (random pics)

Mom: I do have pics of the great horned owls that we've seen- they're still on my camera; I'll get to them in a day or so!!

sb page (for posting online; I've posted this one on the blog before)

our Christmas ornament tradition continues:
the hand-painted ornament we bought in Hawaii

Prescott and Bisbee opening one of their presents

a small Christmas vignette from my collection: this year
Mom sent me the medium tree and the smaller snowman


December 09, 2014

November 2014- scrapping!!

since work has been so crazy, I haven't had much time, inclination, or creative energy to do any scrapping or crafting. But, I finally did get back into my craft room and finished a layout I started, maybe, nearly, a year (??) ago... and the layout is of a hike we went on 7 years ago! (my scrapping process is definitely not 'timely' by any stretch of the imagination, lol!)


We hiked to the top of Picacho Peak- which is between Casa Grande and Tucson- in April, 2007. Sometime last winter I made the base of the scrapbook pages, but never got around to finishing them up. 


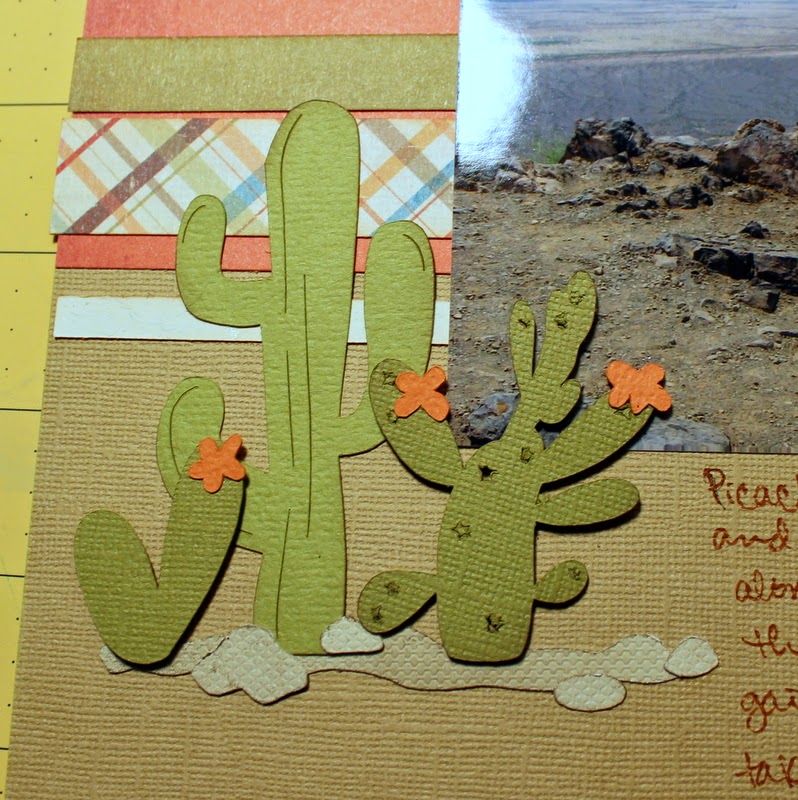
On Black Friday 2013 I bought my Silhouette Cameo electronic cutting machine, but really don't have time to use it very often. I used it for the title, and knew I wanted to use it on this layout for the embellishments, as well. 


Aren't they perfect for this layout?? The Silhouette is an electronic cutting machine that cuts a design you make on your computer... I know it can do plenty of things I will never figure out, but I'm slowly figuring it out. This purchased cut file includes cactus, flowers, and rocks. You can make a design any size you want on the computer, and the Silhouette machine cuts it out! (if you don't screw something up, that is... not that that's ever happened to me, lol!)


I popped up a couple of the pieces with foam tape for dimension, and did some inking on the edges of the rock pieces. 


I had more photos than would fit onto just two pages, so I added two 6x12 pages in the middle to add more photos and journaling. See the squirrel there?? I had to add him into the pages- I could never forget about being bitten when I (stupidly) tried to feed it trail mix!! I did not try to hand-feed it though-- it grabbed my finger when I was trying to set the peanuts down on the ground for it.


Here's a close-up of the barrel cactus embellishment-- the Silhouette cut out the dark green pieces, I glued them to a lighter green background, and added more flowers and rocks.

So, this is my 7-year scrapbook page, lol! Over Thanksgiving weekend, I started printing pictures and designing some more layouts. Once my supervisor gets back from her maternity leave (two more weeks!!) I'll have a little more time and energy to scrapbook... hopefully!


May 23, 2014

scrapping, then and now (again)

In addition to taking lots of photos, I have been doing some scrapping, and rearranging my scrap space a bit, which I'll show you once it's clean (which means it could be months before I show it to you, lol). Anyway-- 

I've also actually been taking photos of scrapbook pages in order to make a scrapbook layout about my scrapbooking hobby. (did you follow that logic? lol!!) To that end, here's a few possibly/probably never-before-seen scrapbook pages from the archives: 

This page was probably made in the early-mid 2000s;
I'm guessing, since the photos are from Winter 1999.
(not sure, as I didn't used to date my pages when I made them)
I've written a bit already about my scrapbook style changing over time in a blog post titled 'My Scrapping Style Evolution.' I think everyone's style has to change at least a little, based on trends that come and go in scrapping just like in fashion, colors that go into or out of style, and new products or tools that become available for scrappers to use. 

a page documenting moving into my first house--
no patterned paper at all here, just cardstock and stickers!

another page from the early 2000s- no real 'design' to the page at all,
just one piece of patterned paper, and some handwritten journaling.
The pages above reflect the 'trends' and scrapbooking styles of the time in which they were made, and I'm perfectly okay with that. I'm glad I have the photos and the journaling that goes with them safely in my album.

For me, my SB style even changes from page to page, depending on what I'm inspired by at the time: a pretty new patterned paper, using a cool new tool or product I just bought (or maybe just 're-discovered' in my craft room!), whether I have pictures I really want to showcase vs. a story to tell, that sort of thing. And that's perfectly okay- for me, it's necessary, even, to keep me interested in the hobby long-term. (with some things, I have a pretty short attention span and get bored easily!)


Another page about the flowers at my first house,
this page was made last year, I think.
(I probably dated the back of the page)
The page above is definitely full of trendy features a la 2010-to-present: the background was misted and splattered with spray inks, there are cardstock letter stickers, there are two 4x6 photos butted up next to each other on one photo mat, there are layers of patterned paper behind the photos, and there are wood veneer embellishments on the page. I still like it! It reflects 'me' today, as far as scrapping goes. I don't do this kind of thing on every page, but it's fun to 'try on' a trend now and then, and even though there's no 'story' I wanted to tell with these pictures, I'm glad to have the photos on a page instead of in a box.


Left-hand page of a 2-page spread made sometime last year.

This is kind of tough to visualize because these next pages are made to go together in the album, so the pages above and below were made together as a 12 x 24 canvas. (I'll take some photos of them together so you can see how they look together.) But, from the photos here, hopefully you can see that these pages are in a very different 'style' than the pink splattered page above. These two pages are much more about the photos and not so much about the 'artsy' or 'trendy' things used on them. They were designed using a Scrapbook Generations page sketch so I wouldn't have to do the 'work' of designing them from scratch, and the focus is much more on the photos (I hope, anyway) than on the artistic details.
  
right-hand page of the same 2-page spread


Still, the various page details were all chosen to support the photos- from the colors of the cardstock and patterned paper to the stickers and flower embellishments I used. In addition, my switch to a digital camera has led me to take more (and hopefully better quality) photos so some of my pages are more photo-centric and photo-heavy than technique-heavy. I also recorded the main details of the day for posterity, to tell the 'story' that goes with these photos. Whatever works for the given situation and the objective you want to achieve, I say!

And then there's goofy pages like this one, made 'just because'

I used my (new-ish) Silhouette cameo electronic cutter to cut the feather embellishments on this page, so it was partially inspired by a new tool. But it was also inspired by the photos, although not in an overly-serious way. This page was made using a divided page protector, which is also 'trendy' and popular right now; in this way, you can look at the sections individually as well as looking at them as a cohesive 'whole page'  that tells a story (well, that was my intent, at least).

a close-up of the top half of the page

Not sure if you can read it, but the page title is: "Bird Brains-- If birds could talk...' and the journaling says, "every once in a while I get a picture that makes me think, 'what is that bird thinking?' and even though I know they don't really 'think' the way we do, it's fun to imagine."
The thought bubble above the mallard (who is looking intently into the water) is 'Boy, do you look GOOD! (if I do say so myself!)' I've taken enough biology classes to be fairly certain that this mallard isn't actually admiring his reflection in the water, but doesn't it sort of look like that's what he could be doing?? 

a close-up of the bottom half of the page
The thought bubble above the grebe on the left-hand side is, '...I may have overdone it with the hair gel... what do you think?' because in the photo, all his feathers seem to be sticking straight up, like his 'hair' (feathers) is spiked up with hair gel. (if birds used hair gel, that is... haha!) The egret on the right is looking straight at the camera and to me he looked kind of irritated, so his thought bubble says, 'Don't even think about talking to me until I've had my first cup of coffee!'  

So, my scrapbook pages can be artsy and trendy, for showcasing photos and/or telling a story, and some of them are just for fun. (Or they can be any and all combinations thereof.)

One of my ongoing projects for the year (besides re-arranging my scrapping space and trying to keep it clean), is to organize all my layouts in albums, and to finish all the mostly finished layouts I have in piles. When (if) I make some progress on those projects, I'll show them to you as well!


February 11, 2014

my other 12-hour crop pages

Here's photos of the other pages I worked on during the 12-hour crop on Saturday; I didn't think I had that many photos, till I started selecting them-- I'll try not to write so much to hopefully keep the post a bit shorter! 

Here's my Christmas 2013 collage page- we didn't put up any Christmas decorations to speak of, partly because of Zola (kittens + trees + glass ornaments = a disaster in the making!), and partly because there was so little time between Christmas and Thanksgiving. I did get out a couple small decorations, so this page is going to be titled 'a small Christmas.' (the crocheted tree reminds me of crocheted decorations my Grandma made, and the lighted ceramic tree is from Tom's Great-Aunt Marie, if I remember correctly.) The rest of the page is a mosaic composed of various pieces cut from the Christmas cards we received. (I always wonder what to do with the cards once Christmas is over, and this was a good way to keep them by saving 'parts' of them.) I did keep a couple cards whole; they'll get put into a regular 8.5x11 sleeve in the album next to this page.

a detail shot- hexagons are 'trendy' right now, so I thought it would be fun to use my hexagon punches to cut bits out of the card fronts. These particular ones are vellum (punched from part of my sister Judy's handmade card), and are attached using metal brads.
 Again, this layout was inspired by a scrapbook layout I came across on the internet and had pinned for safe-keeping. Mine turned out quite a bit different, but I love that I'm actually using some of them to make things from instead of just pinning more and more! (click here to see the inspiration layout, if you're interested.) 

This next layout was alot of fun to make, and turned out pretty much how I envisioned it would- do you know that feeling, when you know your project is working just like you wanted? I don't have that feeling very often when I craft (sometimes my projects seem to have a mind of their own and take a turn I don't expect), but I had that feeling when I made this one! 
the letters for this page were cut using my Cameo- the font is one I downloaded from the internet, called Airstream. (and yes, I can spell: I just need to cut another exclamation point,
because I lost the 'dot' that went with this one- lol!)
It's a fun, light-hearted subject, but one I knew I wanted to make a layout for. Tom and I both love authentic Chicago-style hot dogs, so when we heard they were building a Portillo's here in the Valley (finally!), we knew we had to go. The decor, the food, and the service were all top-notch, just like we remember from 'back home' in Illinois. I tried to capture that 'vintage diner' feeling of the place with the page layout (which is based on another Scrapbook Generation sketch). The journaling will go in the open space under the photo on the right-hand page, probably typed on a tag or on strips of white cardstock.

Somewhere along the way, I found a piece of scrapbook paper that I knew would be perfect for this layout; the paper design was all diner-style signs, which I cut out and put in that vertical area of embellishments. And the 'hot dog' is the Portillo's logo, which I cut from one of the paper bags our lunch came in! (They will ship their food all over the country, in case you're interested- lol!) 

The (somewhat obvious) page title is letters I cut with my Silhouette Cameo-
the font is one I purchased from their online store, called LD Brown Nose.
It's nice and casual, and I think I'll get a lot of use out of it. 
This layout is one I'm glad I finally got to work on- we did this hike back in early April, 2007!! I'm not a hiker at all (my idea of hiking is strolling through the preserve looking at birds, after all), so this is the first and only actual 'hike' I've been on since we've lived here. It was beautiful and impressive scenery, though, so I am glad we did it. (Only Tom managed the last bit to the very top; I wimped out right at the very end where you had to pull yourself up by cables using pretty much just your arm strength.) Oh, and I also got bitten by that cute squirrel you see, there, too- I need to add another page to this layout to explain that, and to add in the rest of the pictures I chose to include. (I also need to add some embellishments to this layout- with just paper, it looks a bit 'flat' to me, especially looking at it in a photograph.)

This shows the rest of the pictures I still want to include, along with scraps of the papers I used and a piece of coordinating cardstock. It's stored in a bag with the rest of the layout for now, till everything is finished. (I want to keep it all together so I don't accidentally use the patterned paper for some other project!)

And here's an example of a page kit I put together for some photos I didn't get to work on Saturday- but the papers and extras are all together in a gigantic zipper bag, so when I do have the time (and the inspiration) it will be a bit easier to get started. The photos are from a day I when visited the Arizona state Capitol in downtown Phoenix. I never got to visit the Illinois state capitol building when I lived there (Springfield isn't exactly next door to the Chicago suburbs, and I just never got around to traveling down there), so I really wanted to visit the Capitol here since we live so close. (It was pretty neat; I'll show some of the actual photos from the trip in a separate post.) 

Since it's the state capitol building (I'm not sure: are you supposed to capitalize 'Capitol' when you write it?), I chose some red, white, and blue papers, along with some more 'Western-type' papers like the denim patterned paper that I think is a photograph of real denim fabric, with actual sewing on the paper. Not sure which of these I'll use when I make the layouts, but they're all together, so they're easier to get to and part of the decision making is done already. 

One more photograph, that probably only another scrapbooker would 'get' my fascination with, lol! The dome of the Arizona Capitol building is covered in copper, and since copper- and mining in general- is an important part of Arizona state history, I included these two specialty papers in my page kit. It was tough to get a good picture of them, but both of these papers are metallic sheen to them, and the one has a brushed-metal feel to the actual texture of the paper. I don't know how I'll use them exactly, but I definitely will try to get at least one of them in there somehow! 

(apparently I don't know how NOT to be wordy... thanks for reading, if you made it this far- lol!)