February 20, 2013

birds and a butterfly (card)

Just a few random photos from the last couple days- first, a card I made last night using scraps of paper leftover from the Quilt Show scrapbook layout I re-worked a few days ago. I've heard people say before that they use their scraps to make cards, but I never really got the concept, for some reason. I had these leftover pennant pieces, the twine, and the butterfly punches in a little bowl sitting on my desk, and that's all I needed- plus a bit more of patterned paper and a manila tag. Voila! I may actually do this more often!


a close-up of the card... (I love having a huge roll of 3-D foam tape at my disposal to use whenever I want to add some dimension to a project!)


This afternoon as I drove into our neighborhood, I actually turned around and drove back to the entry pond common area... because I caught a glimpse of this guy, doing a little fishing- a great blue heron. (he didn't stay very long, so this is the only photo I got- thankfully, it turned out okay.)

I looked around a bit, and saw that he had a dinner companion! This cattle egret was hanging out close by, but he was a bit more shy and took off before I could get a decently clear photo of him. Plus, with all the sun shining on him, I didn't have a very good chance of getting much detail out of the photo, anyway.

The usual selection of ducks was hanging out in the pond- mostly mallards, but there were also some more exotic waterfowl, as well- this group of ring necked ducks meets the definition of 'snow birds'  (haha! just a bit of birding humor, there) since the southern US is their winter habitat. I'm pretty sure they were being so friendly because they thought I'd feed them, but once they figured out I didn't have anything for them, they headed off. (they look sort of ominous, actually, all eyeing me like that!) 


and lastly, a view of the entire pond-- after a few days of higher than normal springish temps around here, it's been cold, windy, and rainy again the past couple days (there was actually a report this afternoon of snow falling in north Phoenix!!) so unfortunately, spring isn't here quite yet!

February 17, 2013

cozy kittys SB layout

so, I've finally moved on from scrapbook layout makeovers to working on making layouts with some un-scrapped photos! I have a pile of random to-be-scrapped photos sitting on my desk, and grabbed a couple of them last evening to work on. These pictures are actually pretty old- the photos are of my first two cats, Cleo and Phoebe. (I got them as kittens, for my 25th birthday- seems like a long time ago, now.) And from the background in the photos, I can tell that the pictures were taken in the very first apartment I lived in on my own, so it was somewhere in the early-to-mid 1990s. Crazy, huh? More like lucky that I've kept them all these years, without losing them! I'm pretty sure these are actually film photos, too, so that's an even better reason to get them scrapbooked and into my photo album.  

Here's the finished layout:


Well, actually, the scrapping process for this page started a bit before yesterday: I knew I wanted to scrap these particular photos, and I knew I wanted a 'fun' patterned paper that included pink, since there's pink in the pictures. The other day I was in Michael's craft store, and there it was: the perfect polka-dotted paper! It includes the pink, but not so in an 'overly girly' way... and the other colors made it easy to choose complementary papers to use with it. The general page layout was inspired by a scrapbook page I found and have saved on Pinterest. (see the Pinterest pin here. The layout was originally pinned from a website called myscrapbooknook.org but it looks like the site's no longer active, otherwise I'd link to the original layout itself.) 

Now, on to the some of the details:


I thought my layout needed a little 'something' in the upper left corner, so I added a couple small snippets of paper left over from making the layout. I added a bit of dimension with 3-D foam tape, and by inking the edges of the striped paper (and most of the other papers) with a black ink pad.


This is a look at the lower right area underneath the title; that tag was also popped up with 3-D foam tape for dimension.  Funny thing about that 'tag' too... it actually started as a 3x4 card from my Project Life core kit! I had another one of them out to make a Project Life journaling card, and I thought the colors would work perfect with the patterned background paper. Altogether, I think I used six different patterned papers on this page, from about as many different manufacturers. Adding in the stickers and the heart stickers, and that makes it a total of eight different patterns and manufacturers. As long as the colors and patterns work together, I don't care who made it, or how old it is. 


And the 3-D pillow heart stickers on this page? They were still on my desk from the Valentine cards I made last week, lol! I thought they fit in perfect, since the photos are of my kitties being all snuggly and loving with each other. (the stickers in this photo are sitting on a gray vintage ticket that I inked and tucked underneath the top part of the photo mat. This helps lead your eye to the photos. 

Between finishing the previous 2-page layout and making this page, I was in my scrapbooking room last night till well after midnight: now that I've finally got my scrapping mojo back, I don't want to quit! (partly for fear of losing it again, I think...) But sadly, right now I do need to quit, at least for a bit- I need to do some yard work. After all those freezing low temps, I need to do some pruning and cleaning up. But the quicker I get it done, the quicker I can get back up to my craft supplies, right? (that's one way to get incentive for completing my chores, I guess!)

my last scrapbook layout make-over

Like I said before, I don't want to make a habit of 're-doing' scrapbook layouts that I've previously done... styles change, trends come and go, and techniques may fall out of favor over time, but that's part of the way any hobby or someone's personal style changes and evolves over time. But... I recently came upon this layout when I was organizing and cleaning my room, and I decided I just had to re-do this one:

I don't even have the album it came out of... it's long gone, and I don't think I ever even made any other layouts on these kraft-colored papers. Plus, they're strap-hinge pages, and I don't even use that type of book any more. And, c'mon, look at it! I mean, really!! I wrote the title in using marker! (and badly, at that!! lol!!) So, I used my trusty bottle of Un-Do, removed the photographs, and re-made the layout using using more current scrapbooking papers, tools, and techniques. Check it out below:

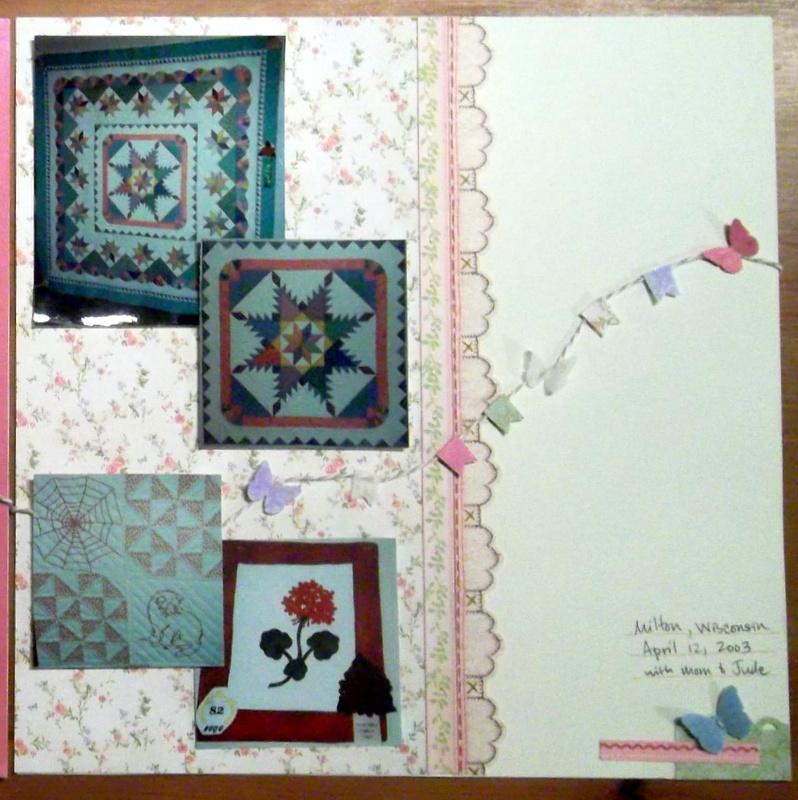
I think the colors and papers I chose highlighted the photos and the subject matter much better than the kraft-colored cardstock the layout was on previously did, don't you?? Plus, really, there wasn't much of a design to that layout, at all-- just a couple of sad little flower stickers on some 'blah' colored cardstock. (It was kind of embarrassing to look at that layout, actually- especially the badly done lettering. I felt no remorse whatsoever as I took it apart!)

I used a good mix of old and new supplies here... the letter stickers are new (last week), and the floral paper is at least 12 years old... nice, huh?? See what happens when you organize your space?? (that's a pep talk for me, actually-- to remind myself that when things are organized, I can actually find my stuff to use it!) The tiny little pennant punch is only about a month old, and the vellum I used for punching the pennants and butterflies was at least 10 years old. Let me tell you, it feels good to actually use my supplies to make scrapbook pages!!

I used all the photos but one... I decided the leaf photo, while it was a good representation of the quilt show, didn't match the rest of the photos-- it was a totally different color than the rest of the pictures, and the only one that wasn't rectangular or square. So, out it went... and again, I didn't feel bad about it at all. (like I've said before, the fact that I take sooo many digital photos now means I'm better about actually choosing only the ones that I like the best, or capture and event / moment the best. Photos aren't nearly as 'precious' as I used to make them out to be when a roll of film was only 24 photos, and cost $$ to print the bad ones along with the good.) 

I added a couple repeating motifs across the pages to 'draw' your eye across the page, including the green scallop, the different pinks, and the butterflies. These blue butterflies looked a bit plain by themselves, so I actually stitched them to the page with cream-colored crafting floss for a bit of added detailing to catch your eye.

I used a scrapbook layout sketch from Scrapbook Generations sketch book #8, which showed a line of embellishments flowing across both the pages. (in the book, it was stars, but I changed it to this string of pennants and butterflies using tan and white baker's twine.) I don't know why I have to have ideas that cause me such inordinate amounts of 'fiddling' and messing around with things- this layout took me at least a week to do (off and on) from start to finish, and the string of pennants took at least 2 hours all by itself, to get all the pieces situated and adhered the way I wanted. But, I do think it was worth it! I added a bit of beige gingham ribbon, and a line of hand-stitching as well, to reinforce the 'sewing' theme of the photos.

 This meandering line of butterflies and pennants turned out quite nice, in the end. The above photo shows more details-- the scalloped border is printed paper, but looks like sewing, as well- more sewing to reinforce the theme, without any more work. although now that I think about it, I could actually sew over those cross-stitches, maybe... hmmm...?? No, I'm not going to do it! I need to decide that when I think a layout is done, I should quit, and leave it alone. 

One more time, here's the 'before layout' above, and the 'after' layout below-- it's so much better now, I can't even begin to describe how much happier it makes me to see it like this!

Now I think I'm really done with re-doing already scrapped layouts, and doing scrapbooking makeovers... it's time to move on to actually scrapping some new photos for a change! (or some 'old' photos, whichever it happens to be- I have plenty that fall into both of those categories!)

February 15, 2013

jumping cholla


...a cholla cactus that was just outside the nursery grounds, shot through the links in the chain link fence. (The way I processed this photo to emphasize the gold qualities of the light makes me think of those early 20th century postcards printed on linen.)

February 13, 2013

photo heavy post- last weekend's food and garden tourism

A week ago Saturday, Tom and I headed south to Tucson, for lunch. Yes, lunch! (and a bit of sightseeing, in addition to eating.) It was a beautiful day for a drive, and we headed out early...
our destination
We got to the restaurant  in South Tucson at about 10:30 am to wait
for their 11:00 lunch opening. And we were not the first people there- it was a good thing we left home early!


The restaurant is 'Mi Nidito' which means 'My Little Nest' in Spanish;
it's been serving food in Tucson since 1952, and was featured
on the Travel Channel show Man vs. Food.
We waited with some very nice people out front of the restaurant, and got a booth when the restaurant opened... our waitress asked, 'do you need a menu?' (apparently they get a lot of regulars who know what they're going to order!) Us, now, we needed some time to check out the offerings on the menu, so we could narrow it down. The couple in the booth behind us didn't need menus; they ordered straightaway, and were giving us a bit of advice about what was good. In talking to them, we found out that was because they've eaten lunch at Mi Nidito every Saturday for the past 20 years! Now that is definitely a ringing endorsement! One of the restaurant's other 'claims to fame' is one of their previous customers: former President Bill Clinton- they even have the President's booth marked in the restaurant! (and no, we didn't sit in it... lol!)

Our table: we had no idea we were going to get this much food!!
The food was delicious, and the portions were quite generous: we brought home plenty of leftovers!  We got a Tostada with chiles as an appetizer (which is sort of like a Mexican pizza), I got chicken enchiladas with red sauce, and Tom got a beef chimichanga. The chimichanga (which was the size of a pillow, lol!) was made with their house specialty: a shredded beef called birria. Birria is brisket which is slow cooked with chiles and spices, then shredded. Neither of us could place the flavors in the shredded beef, but luckily we happened to see the television show episode again last week- turns out that the 'secret ingredient' in the shredded beef is pickling spices, which gives it a really complex, mellow flavor! The food was all delicious, and we'll definitely be eating there again.

After we ate lunch, we headed back north to do some sightseeing at a cactus nursery we'd heard about from some friends who live in Tucson. (On the way, we saw an estate sale, so we stopped for a quick look. Turns out it's a recurring sale, and there was so much stuff that a quick look wasn't possible- so I'll save that one for another time, lol!)

The cactus nursery was total visual overload-- I definitely want to go back again, and maybe bring at least few plants back home with me. I'd love to have (at least) one of everything, but we don't have nearly enough room! For now, I'll have to settle for admiring the plants in the photos and post just a few of the many pictures I took to give you an idea of the scope of the place:


one of the (huge) cacti right at the main entrance-
I don't know what kind it is, but I'd love one!
 The property is on approximately 10 acres, and contains rows and rows of nursery plants and greenhouses for propagating cacti- check this out!  (and don't forget, you can click on any of the photos to make it larger.)


one of the many propagation houses on the property
I can't even begin to imagine how many hundreds of plants are in this greenhouse, let alone in all of the greenhouses on the property- there had to be at least 10 or 15 greenhouses altogether (the actual number is 24, according to their website). Looking at the pots in these houses closer, it's even more amazing to contemplate:

teeny, tiny baby cacti
Some of these cacti are so very tiny that you can't even see any of the plants themselves; all you can see are the feathery cactus spines. I had to add in the quarter when I took the photo just to add a sense of scale to the picture.

I don't even know what kind of cacti this is, but I
thought it was really cute, since it was so tiny!

As we wandered around on the property, we came upon a 'cacti compost heap' of sorts. We both would love to figure out some way to bring this impressive Saguaro skeleton home with us... unfortunately our family room isn't big enough for it, nor was it for sale (and even if it had been, I'm sure we couldn't have afforded it, lol). But wouldn't it make a striking accent piece in a room, preferably with a spotlight on it?!?


A view from the nursery's property off to the east. These are either the Santa Catalina mountains or the Rincon Mountains- I'm not sure which. (geography was never my strong suit.) Regardless of what mountain range it is, it's a gorgeous view. That's one of the things I love most about living in the desert, the expansive vistas and the fact that you can see around you for miles.

A really cool looking aloe plant in the main greenhouse!! he looks kinda mean,
doesn't he?!? I definitely would love to have one of these for our backyard!

a close-up of the individual flowers in the aloe flower cluster-
I bet the hummingbirds would love it, too!

A view of their main display garden... cacti can definitely make
an eye-catching presentation when you landscape with them!

A few (very large) containers in the display garden area. 
a sea of Golden Barrel Cacti in the main greenhouse area
I have tons more photos from the nursery- we were only there for a couple hours, but I took close to 100 photos in that time. This place was amazing, and we probably didn't even see half of it in the time we were there! If you want more info about it, you can Google it: Bach's Cactus Nursery. Since they don't ship plants, they don't have too much of a website, but if you click on this link: Danger Garden blog post about Bach's nursery you can read a very nice blog post written by a gardener /  blogger that contains many more photos of the place. (and I'll post more of my cacti photos soon!)


February 10, 2013

Hoover Dam SB Layout- updated & finished!

two posts in one day!! don't count on it happening very often, but I didn't want to wait any longer to post this:

I finished the Hoover Dam 2-page scrapbook layout! It took me a few weeks of mulling things over and working on it a bit at a time-- to be honest, there was more mulling than working till yesterday afternoon, when I worked for a couple hours straight and finally got all the elements stuck down. 

Here's the finished updated layout (click on any photo to see it larger):


I added quite a bit of lighter colored paper to get rid of the plainness of the kraft- a distressed ledger paper on the left-hand page under the title and at the top of the right-hand page; I also added manila shipping tags around the layout for grounding the embellishments.


 I added quite a bit of texture and interest with chipboard and 3-D foam tape- the 'before' title was flat (boring) stickers, so I re-did it using chipboard letters (see the photo below for an explanation). You can see in these detail photos that I edged all the light colored papers with Distress ink (in 'Vintage Photo' ) to give them added dimension.


yellow chipboard alphabet stickers (American Crafts Thickers, maybe?)

I really liked these particular chipboard sticker letters for the font and size, but they're yellow-- so they got sanded, base-coated with gesso, painted with two coats of barn red acrylic paint, then sanded and trimmed around the edges... voila, red chipboard letter stickers that match my layout! (that was part of the reason it took a couple weeks to finally finish the layout- but I think the result was worth it.)


A look at the updated title section and the 3-D 'America' embellishment. I added a couple pennant flags with sticker letters, some additional punched stars, and used 3-D foam tape for interest. Much better! I also 'grounded' the whole area using the manila tags, so it wasn't just 'hanging out in space' any more. I added the polka dotted deco tape to each of the long borders for a bit of extra dimension and to bring the light blue into those areas.


This photo is the upper-right side of the two-page layout showing one of the other embellishment areas. A few more punched stars and red and blue label stickers give it some added color. I added short captions for each of the pictures to the journaling tag. If you read it, you'll see I made a spelling error on the. very. first. line. (drat!!) but I just left it alone. I didn't want to mess around trying to find something else to use for journaling, and I figured anything I did to cover it up would just bring more attention to it.


Above is the bottom right embellishment cluster: more manila shipping tags, red and blue label stickers, and more punched stars. If you look at this photo and the one above, you can see that I only really used one blue sticker (round) and one red label sticker (the rectangle). I cut both of them in half and overlapped them so you can't tell they're only partials, a clever trick I learned from watching Shimelle's scrapbooking videos. (Actually, all of these embellishment ideas are ones I learned from Shimelle; she has a wealth of design information available, both on her blog and in her 2Peas videos.)

The photo above shows how I labeled each of the photos to go along with the journaling captions- I typed the numbers on the same ledger paper, punched them out with my circle punch, and inked around the edges of each circle to match the rest of the paper.


And here it is again, just for reference: the 'before' layout in all it's unfinished plainness and boringness.


I quite prefer the 'After" layout.  I think I'm going to add a 6 x 12 insert to this layout so I can add some historical facts about the dam, maybe with some additional detail photos of the architectural features-- so I'm not done scrapping this visit after all. But I'm really happy with how this layout turned out!

you don't know what you have until you clean your room...

 ...and when you do clean, you find all sorts of interesting things!! I'm finally pretty much finished with cleaning and organizing my craft room (as much as I'm going to do for now, at least...) and I have four boxes of stuff sorted out that are going to go to the local scrapbook store's garage sale in April. One box of magazines and assorted art / scrapbooking books, and three boxes of paper, stamps, inks, and other 'stuff.' For now, they're all living underneath my table, (mostly) out of the way.

the garage sale stuff includes things like alcohol inks (I never did figure
out how they work), storage organizers I no longer use, stuff like that.

rubber stamps I don't use any longer, deco tape in colors I don't
like, patterned paper and cardstock I know I won't use, etc.

my workspace, with enough space on to actually work!
I've been working on finishing up the layout seen on my desk above- a stop at Hoover Dam from Labor Day weekend, 2009.  It's nice to have usable workspace again! (although I do have to work at keeping it usable; I have a tendency to get a ton of stuff out when I work...)

the other table, now with sewing machine!
The other table is now cleaned off (enough) to work on, too! (the scrapbook store garage sale stuff is underneath this table...) I finally got this table cleared off enough so I can have the sewing machine out all the time. I've seen lots of scrapbook pages and cards with sewing on, and this way, I'll be able to use the sewing machine without having to haul it out of its previous storage cabinet...this way I'll be more apt to use it than I otherwise would have been.

and now, for the 'you don't know what you have until you clean' part of the post:

my old-school pencil sharpener, now found, and finally
up on the wall so I can admire (and use) it!
 I've had this pencil sharpener for years-- it came from my Grandma's house, I believe, and I've had it up wherever I've lived.  I had it up in my craft room in our previous house, but I never had it up in this room- mostly because I only just found it a couple weeks ago! (I had it stored in a super-secure location, so I wouldn't lose it, I guess.) I do have a small pencil sharpener I carry in my scrapbook tool box, but there's just something nostalgic about cranking the handle on an old-fashioned manual pencil sharpener.


February 04, 2013

SB layout do-over #2...

Actually, this layout was never finished in the first place, so it isn't technically a 'do-over' but I'm going to add quite a bit to it in the process, so it isn't fair to say I'm just 'finishing' it, either. And I do not want this make-over process to become a habit, because I have plenty of other layout ideas floating around in my head that I still want to make! But this layout has some (rather obvious to me, now) design flaws that I really want to correct before finishing it up and calling it done.

two-page spread, Hoover Dam
I made this two-page spread during a weekend at the Phoenix Scrapbook Cottage. I didn't use a page sketch or anything for it; I just shuffled the photos around until I liked the arrangement. I really liked the layered embellishment I made (it was cut out with the Cricut electronic cutter), and the stars, but other than the photo arrangement, I really didn't think through the whole page layout when I did it... maybe I was tired at the time? I don't remember. I stuck the elements down to save the arrangement, brought it home, and left it in my box of unfinished layouts. So, it's finally getting the 'makeover' treatment (sort of), too.


 The only thing I did on this layout when I made it was to add a thin border at the bottom, attach the title stickers where I wanted them, and add the map embellishment near the title. The problem is, these things aren't really 'related' at all to the rest of the design- they're just sort of 'floating' out there on the page-- this especially bothers me with the title. 


I know I left the blank space on the right-hand page to add journaling, but I didn't have any plans for how I was actually going to do it. And, even though there's quite a few photographs, the pages just look 'empty' with only that sad, lonely red border on all that kraft paper. So, it's finally time to both jazz it up and finish it up! 

my pile of potential choices
I rummaged through my boxes of assorted bits, border and journaling stickers (my rummaging system is working so far!), and pulled out this pile of stuff. It's all got colors I thought might match with what's on the layout already. There's an assortment of things to pick from: a number of label stickers, a couple journaling cards, tags, and two rolls of blue decorative tape. 

Before the Super Bowl game started this afternoon, I spent a few minutes working on the next steps: I un-stuck the title stickers and those few embellishments and set them safely to the side, added a piece or two of patterned paper to my 'to-pick-from' pile, and started narrowing down the choices to just a few stickers and tags. Now the layout will have to sit for a day (or two, or more) till I have another few minutes to make my next decisions. But at least the process is underway! (some people say they can make a scrapbook layout in just an hour or so; my process is days- or months- or more!)

In other news, we ate homemade tacos for dinner while we watched the Super Bowl-- it was a good game, although long, with the power-outage delay! Yesterday, we spent the day out: we drove to Tucson, ate lunch at a very popular (and very good) Mexican restaurant, and visited a cactus nursery jam-packed with cacti and succulents of all types and sizes... I wanted one of each! And I only took 160 pictures the entire day, too- lol! Once I edit some of them, I'll post a few pictures. We're definitely going to go back sometime...to both the restaurant and the nursery. (not to mention that we happened upon a monthly estate sale... in my book that makes for a definite road trip repeat!)