January 31, 2013

and now,some of the 'organize' part of the project:

So, organizing for me- and maybe most scrapbookers or crafters- is an ongoing process: how best to contain and store the supplies so that you know what you have, can get to them when you need them, and can keep the space organized (as organized as necessary, depending on where you work) when you're done? I still haven't hit on the winning combination, but I think I'm getting closer. I also think part of it is knowing how you work, and doing what's best for the way you work. There are so many items you can buy for organizing crafting supplies that it can get overwhelming. If you look at magazines or the internet, you can see countless 'pretty' pictures of creative spaces where everything is sorted by color, or by item type and color, in boxes or jars... and sometimes I wish mine could look like them, but they just don't work for me. 

In the past, I've tried sorting and organizing things into small containers, or little drawers, like the photo below (this pic is from our previous house):

  
(It's messy, but I wanted to point out a couple things- the first is the yellow unit on the left side with the labeled drawers. I sorted little things (buttons, brads, etc) into the drawers, but then I'd have to open 4 or 5 of them to find exactly what I wanted. Some of my unmounted rubber stamps were stored in a large three-ring binder on the shelves above the desk. It might look good for storage, but I'd never use them! The shelves above the desk also hold bins (homemade) that I used for storing my paper scraps in zipper bags, sorted by color (ROYGBIV). Again, after I sorted and stored them, I'd never use them again. The paint-can-looking thing in the middle of the desk was for organizing tools; it had lots of little pockets for holding your pens, scissors, and the like. You guessed it- I'd never use any of it. (or if I did use something, I wouldn't put it back, because it was too hard to find it again.) 

So, my new strategy for organizing is: Categorized Rummaging, lol! I'll explain a bit below...

The tool bin. (it's an ArtBin Super Satchel divided bin
This container holds scissors, adhesive, my most often-used mini alpha stamps, replacement blades for my paper cutter, etc... the things I need for most of my scrapbooking or crafting projects. I've been using the tool bin for a while now, and it seems to work pretty well; I can see what's in it by just opening the lid, and things are well-contained inside it. Obviously it travels well if I scrap away from home, but even when I'm home, I just leave all these supplies in it. That way, there's only one place I have to look for any of these items. And it's clear, so I can see at a glance what's in it (in a general sense, anyway).

Since this had been working for me, I decided to do something similar with my other supplies. No more teeny drawers of things sorted by color, no more boxes that I can't see into so things get forgotten about... I need to see it so that I'll use it, but still be able to contain things (somewhat) so they don't get dusty, or don't get chewed up or dragged around by cats. (don't laugh, they've done that!)

The decorative tape bin
(along with a few stamps that I need to put away)
And hey, there's plenty of space for more tape!! lol!

The memorabilia bin
I bought a number of 12x12 bins at Michael's recently when they were on sale for super-cheap; they don't have the handle like the ArtBin does, but they'll do just fine. This particular one is where I've started to put memorabilia I might want to use for a SB page- various pamphlets, business cards, maps, stuff like that. This container / category is still a work-in-progress, but it's better than where this stuff used to be, which was in assorted bags stuffed on a bookshelf, or worse yet, piled in the middle of the kitchen island!

Shiny stuff-- rhinestones, sequins, and the like.
A lot of people do their organizing by color- all the blue paper, stickers, rhinestones, thread, etc together. That's fine for them if they think like that... "I want to make a blue-themed page so I'll get all my blue stuff out." That's not how I work, though. I haven't figured out what my exact thought process is quite yet, but I know it's not that. So, I sorted through my stuff and took out all the similar things- is it shiny or does it have rhinestones? if so, it goes in this bin. (this stuff will probably end up in a box with a lid, so I can travel with it if needed.)

The 'additional stuff' bin, for want of another term:
border stickers, other stickers, chipboard shapes, flowers, etc.
Other people create their pages or projects based on the manufacturer brand-- they might want to make a page or card using all Echo Park or Studio Calico materials, so they store their supplies separated by manufacturer. I did have some of my stash organized by manufacturer, but again, there would be a lot of stuff I wouldn't ever even look at, let alone use. With my supplies organized into larger categories (based on 'what' it is rather than who made it or what color it is), there's at least some chance I'll look at it and use it on my page, no matter what company made and sold it.

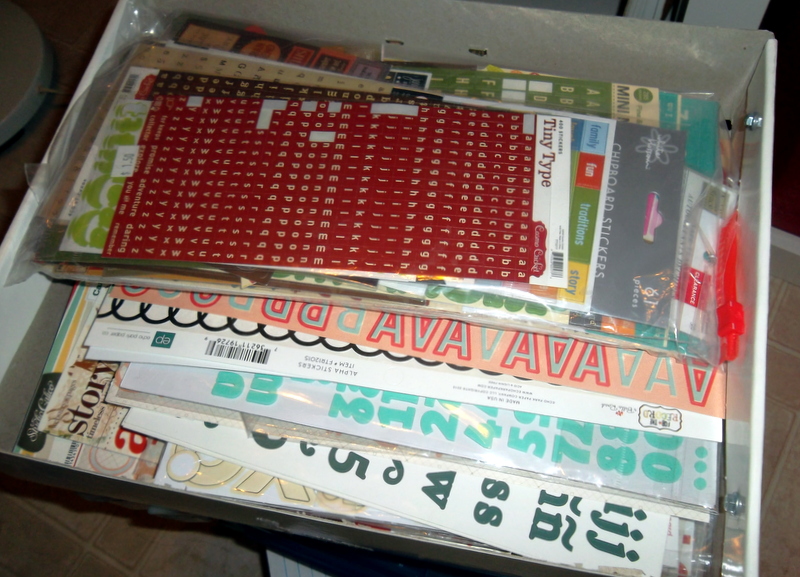
The alphabet sticker box, separated into two
arbitrary categories: 'large' and 'small'
Again, all different colors and all different
manufacturers are stored in the same box.
I haven't really used this new system to make a scrapbook page yet so I don't know how well it will actually work, but I'm thinking it's closer to the way I think and create than the way I used to have things stored. I like 'rummaging' through boxes and shelves when I'm at a flea market, antique store, or estate sale, so I decided to apply the same sort of thinking to my scrapbooking supply storage. 

Journaling card storage: all sorts of stickers, cards, and
shapes that have blank spaces for writing on. (mostly)
In addition to journaling cards, the container above (sorry for the dark photo) also holds my small stash of October Afternoon, Cosmo Cricket, and Studio Calico stickers and cards (right after I said I didn't want to separate things by manufacturer, lol!). But those are my very favorite ones, and this will hopefully make it easier to find them when I want to use them.

There are more categories of things I don't have current photos of yet (patterned paper and cardstock come to mind) and others I don't have completely sorted out yet, like my stamps and inks. I'll take more pictures as I finish the re-organizing process.

One other thing this has shown me about my supplies is that I have alot more of some things than I thought. I would have never thought I had enough alphabet stickers to fill that entire box! That means I don't really need to buy any more until I use some of them, loL! And hopefully now that they're more centrally located, I'll find it easier to do that very thing! Not everything is organized yet, and I certainly wouldn't call this system 'totally' organized (or pretty) by any stretch, but it's a start... and it's a bit of a mind-shift for me that will hopefully improve my creative process in the long run. We'll see how it goes, and whether I need to tweak it some more. 

Hopefully this new method of organization will help me to avoid a work space that looks like this:


(in my defense, this pic is of my space at a weekend long crop where there were no cats. But still, there's only so long that you can work in a space that looks like this- and it isn't very long, lol!)

January 29, 2013

making good on my New Year's resolution...

...to purge, clean, and organize my craft space-- you know, that room that I could barely walk into a month ago, lol! I think it's well on its way to finally being organized and usable! I did a lot of purging to start: we have a 55-gallon recycle bin, and I probably filled it once, all by myself, with just paper and cardboard-- lots of it was scrapbooking layouts I had printed off the internet, old, old issues of scrapbooking magazines, and all sorts of cardboard boxes. After looking at it all, I realized most of it was really useless- I currently use the website Pinterest to save links to scrapbook layouts and websites I like, and most of the magazine information seemed extremely outdated (not to mention full of out-dated advertisements). So, off to the recycle bin it went! (At least 5 medium-sized boxes of random stuff went to Goodwill, as well: books, old dishes, etc., most of which I probably got at the thrift store to begin with.)

Goodwill books

Sad to say, some of the boxes I unpacked while doing this cleaning project had never been unpacked from when we moved into this house initially, over 3 years ago now. I guess that means I didn't really need the stuff inside them very bad, doesn't it?? (I did find some things I thought I'd lost, too, though, which was cool!)

assorted Goodwill stuff

The next step was to decide what crafting and scrapbook supplies I didn't want any more, and sort them out... I signed up for the local scrapbook store's spring 'garage sale' in April, where people bring in their scrapbooking and crafting supplies to sell, and get store credit for everything sold. It's a pretty well-attended event, so I hope to make a bit of money (store credit, technically), and pass some of my stuff along to someone else who will find them more useful than I did- things that no longer fit my style, or crafty things I bought intending to use them at some point, but never did. (I'm not the only one who does that, right?!? hopefully not, lol!)

scrapbook garage sale box #1
...things like old sets of rubber stamps (from back when I used to make stamped greeting cards, but I don't really do that very much anymore), rolls of decorative tape I don't really like (and know I won't use), some old bottles of glitter that I bought at the thrift store and never even used...

scrapbook garage sale box #2
...sheets of cardstock and patterned paper that I've had for years and finally decided to pass along to someone else who might use them (I mean, really- why did I ever think I'd use bright orange cardstock, anyway?!? and I know some of the patterned paper was bought back in Illinois, before we moved to AZ), stickers, assorted tags and scrapbooking embellishments...

scrapbook store garage sale books and magazines
...and a large number of more up-to-date scrapbooking magazines and craft how-to books. Hopefully shoppers at the the SB garage sale will like and buy my stuff, so I can get a decent amount of store credit for it (which I will then spend on buying new stuff, of course!! haha!).

I've also done some re-organizing in how my supplies are stored, which I'll show in my next post.  My end goal is that all this purging, cleaning, and re-organizing will allow me to actually create more scrapbook pages and cards! (It's not a very high bar to meet, considering that the last scrapbook page I created was made in May 2012, I think...) In all the time we've lived in this house, my space- and the supplies in it- just wasn't set up in the best way possible, so the only scrapbooking I actually did was when I attended a weekend scrapbooking retreat a couple times a year. I'd really like to do crafty things more often than that, so that means making my space here at home more useful! And finally, I think I'm on the way to doing just that!  (it's about time, right?!? lol!)

(And of course, there's the cat issue to consider as well: I'd really like to be able to keep the door to my craft room open sometimes when I'm not in there, which means things have to be cat-safe. If not, I'll end up finding erasers, paintbrushes, and other little things all over the house... or else they'll be lost forever under the refrigerator or stove.)


January 24, 2013

journal page randomness:


watercolor background, random words, scribbled black crayon.
washi tape and printout of vintage photograph.


collaged background, various strips of washi tape.
vintage book image, journaling with various pens.

collaged background, wash of white acrylic paint.
magazine image and words, details with glaze and souffle pens.
(quote on page is from the movie Now, Voyager with Bette Davis.)

close-up of vintage book page image (one cute squirrel!!)

close-up of glaze pen detailing:
stitches... waves... topographic map markings... 

Currently, I've switched from 'journaling mode' to 'scrapbooking supply purging and organizing' mode... and some progress is being made!


January 21, 2013

Vocabulary word of the day: hangry.

han-gry (han-gree) adj.  A state of anger and irritability caused by lack of food. Hunger causing a negative change in emotional state.  
(definition taken from the Urban Dictionary.)

See below for example.


Pic 1:  Fixing the kitty dinner; everyone mills around waiting.

Pic 2:  Butters bops Ariel on the head.

Butters gets 'hangry' when she doesn't get to eat on time!! 
(it's pretty funny to watch.)


January 09, 2013

journaling with random words and type

one thing I've always loved is reading, and words themselves (can you tell? lol!)... when I was little I would read part of a volume of the encyclopedia, or the dictionary, for fun. (yes, I was a bit geeky, I suppose, lol!) Words and phrases fascinate me; they can be so essential in setting the mood in a novel or story. (an aside: if you want to read wonderful narrative descriptions about the American prairie, I highly recommend reading the novel Oh, Pioneers! by Willa Cather... her wonderfully vivid descriptions of the prairie grasslands make me swoon every time I read them.) 

Anyhow, back to the journal pages... I recently went on a cutting-and-pasting spree through a fashion magazine (including images, words, and phrases) and jumbled it all onto a journal page- here's the result:  

I really like how it turned out! It was done on a previously painted background (painted with bubblewrap, one of my favorite stamps), so all I did was add in the images, a bit of deco tape, the text, and a bit of coloring with gel pens.

So, I couldn't just stop there, now, could I? In addition to using magazines for collage, I also have a small stash of "vintage" hardcover books (nothing valuable, or I wouldn't cut them up) that I use for backgrounds, or if I want a particular word or phrase. For example, I have a vintage Gregg's shorthand instruction manual from the 1930s, a vintage outdated world atlas, and a couple Reader's Digest Condensed books. Although the type is a bit small, these are good for finding words and phrases in, which I did for the page below: 


The background was simply torn pieces of paper that were glued randomly to the page, then I colored the spaces in between with my Stabilo watercolor crayons. There's also a bit of doodling on the different papers. I looked for words or phrases (2 or 3 words in a row) that sounded interesting in my Reader's Digest novel, cut them out, then I piled them together. After finding a few, I started shuffling them around till I made an interesting combination, like this bit of 'found poetry' made from random words and phrases:

And no, it doesn't really mean anything; it sounds kinda cool though, doesn't it? 

In other journaling news, I'd really like to show you a picture of this journal; it's getting pretty full, which is really exciting! But, alas, I accidentally deleted it out of this post... (drat!!)  So, I'll save that one for another post.


January 06, 2013

wow!!

This amaryllis is just out-of-this world with flowers-- I've never seen one have this many blooms at one time, so I had to take some more photos:

a different vantage point (from a few days ago)
Every night, the flowers go into the pantry for safekeeping from the kitties (I don't trust them with indoor plants!). The amaryllis has to go up onto the top shelf (it's the only shelf tall enough to hold it) , and when I placed it up there I realized it was a really good view of all the blossoms, so I got the camera and snapped a pic.

7 flowers open at once, now... (this was earlier today- Sunday)
I think the first couple are almost done blooming, but the overall bloom time should be at least another week.

same vantage point again, this afternoon (Sunday).
These flowers are beautiful, and have really brightened up our kitchen this winter. I am really glad I picked this plant up (on a whim) when I was at the grocery store. (I just hope it doesn't get so top-heavy it tips over!!)


January 03, 2013

random photo catch-up

yup, we're still here! We had a pretty low-key holiday that was spent mostly at home, with Christmas day spent at the home of some very close friends. I didn't really take many photos over last few weeks, but here's a few random ones:

Holiday flowers: Christmas cactus and Amaryllis
A couple weeks ago, I went to the local grocery store to pick up something food-related, and came back home with these! I entered the store through the greenhouse section- what can I say? LOL! These flowers remind me of the holidays growing up, because Mom and Grandma would both have their houses full of amaryllis (what's the plural for that, anyway?) and Christmas cacti during the winter. The white Christmas cactus is going gangbusters, while the magenta one, being smaller (it's the one on the left that's hard to see), has only got one flower open right now... the only word to use for the amaryllis is amazing!! There are two flower stalks: the first one has six (!) flower buds, and it looks like all six of them will actually bloom! Hopefully they'll all last, and I can keep them alive through the summer. (I'm not sure if my Midwestern-raised green thumb is up to the task here in the desert.)


Holiday dogs! L-R: Prescott, Bisbee, Krista
 One of the Christmas presents we gave to the dogs (and ourselves) was taking all three of them to the groomers... don't they look pretty?!? It's a big job with a long-haired dog (way too big for us to want to tackle it on a regular basis), and the groomers definitely earn their money! (by the way, Tom is off-camera holding up a treat- that's why they're all sitting so attentively. They don't sit still on command for more than about 1 1/2 seconds, otherwise- lol!)


winterizing in the AZ desert!!
We've actually had a freeze warning in effect for the last couple days, so we had to 'winterize' a few of our plants- the Styrofoam cups protect the growing tips of the cactus arms from getting frostbit. It looks goofy, but it works! This is our night-blooming cereus, which is doing really well, so I don't want it to get frostbitten.


Winterizing method 2- this method doesn't work on cactus, lol!
The plant under here is a natal plum, a low-growing evergreen
shrub native to South Africa: click here to see a photo of it
Mom was asking me recently what winter in AZ is like, and if we really notice a difference. Besides the obvious temperature changes (it does get down to freezing occasionally at night, and every once in a great while- like every 5-10 years- there might be a visible snowflake or two falling somewhere in the Valley), there are some other differences. There are some deciduous trees that lose their leaves; the quality of the light and sunshine is much weaker (it's still lots better than having gray skies for months on end, though); it gets dark much too soon for my taste; and it rains occasionally (not like a monsoon storm, but a wet, damp, cold rain).  

One other way I know it's winter is when I'm running the water inside the house- the water takes forever to get warm or hot when you run it! LOL!! It's an odd thing, but there's a good reason for this: since the ground doesn't freeze here, our water pipes are buried very shallow underneath the ground. Because of this, the water never actually gets bona-fide 'cold' during the summer, and it also takes much longer to heat up during the winter. 


Afternoon-sun-basking kitties
One other way I know it's winter is that the cats get a lot friendlier, both with us and with each other. They get very 'cat-like' and hang out in the sun, or curl up on any blanket or afghan that looks comfortable. (including right on top of us, if we're sitting still!) They would never do this in the middle of the summer (not that they could sit in the sun even if they wanted to, since we have the sunscreens up to block the light). 

So, now it's on to 2013- both Tom and I are sort of glad to have 2012 over with, actually... what with my two surgeries and a cancer diagnosis, a cat illness and surgery, and a mysterious dog sickness (he's finally back to normal, thankfully), 2012 wasn't exactly a barrel of laughs, and we're not sorry to see it gone. Here's looking forward to a year of better health and good things to come, for all of us! 

(except for those pesky New Year's resolutions, one of which is for me to clean up my craft room: we were watching a Hoarders television show marathon over the holidays, and some of it was hitting a bit too close to home for comfort-- lol!)

January 02, 2013

journal pages: history in flowers...

apparently, I have somewhat of a habit of writing posts, then forgetting to hit the 'publish button. I wrote this post about a month ago, and just never published it: 

Another journal page, this time a '2-page spread' that started with a background collaged when the book was made. The background papers include scrapbook papers and brown- paper bag (? I think) which made the pages a bit stiff-- note to self, don't do that again!

history in flowers... 
Above is a close-up of the left-hand side; I added an image found on the internet (from the Graphics Fairy, again, maybe?), deco tape, and some souffle pen details. The writing was done using one of my newest items, a set of Italic lettering stencils... (I love playing with new stuff!)  Below is a photo that shows both pages:


history in flowers... both pages
What's on the right side (the entire page topic, really) is a newspaper article about gardening that my mom sent me a couple weeks ago . I thought it was really interesting, and didn't want to just recycle it after I read it, so I pasted it into my journal. 

I don't know why it took me so long to do this sort of thing in my journals; I still have fond memories of the big 'scrapbooks' my Grandma had that we used to flip through whenever we visited her. The pages were made from wallpaper sample book pages, and were pasted full of newspaper articles, quotes, comic strips from the Sunday funnies, and other interesting things. Sadly, I don't know whatever happened to them... I guess there's not room to keep everything, but I can keep a few of my favorite things in my journal, at least!